1
12
submitted 3 weeks ago by pineapplelover@lemm.ee to c/knives@sopuli.xyz

Been thinking of getting my first nice knife. I currently rock the Ontario Rat 1, really it because it's a nice beater and has a serrated side. I don't think nice tanto knives have serrated side but I'm willing to compromise since they look so nice.

2
1
3
6
NKD: Kershaw Livewire (social.goodanser.com)

NKD: Kershaw Livewire

I've wanted a Livewire for a while, and I'm going to be somewhere it's legal to carry for a while so I picked one up used. OTF knives are often optimized for the preferences of the mall ninja crowd more than for practical utility, but this one seems to strike a good balance.

#knife #knives #EDC #EveryDayCarry #OTF @knives

4
8
Demko AD-20.5 CF (lemmy.world)
submitted 2 months ago by Gxost@lemmy.world to c/knives@sopuli.xyz

Shark Lock is even better than I thought. It's so smooth and easy to operate. See example (2.2 MB)

5
1
Squid Industries Stickers! (cdn.imgchest.com)
submitted 7 months ago* (last edited 3 weeks ago) by pineapplelover@lemm.ee to c/knives@sopuli.xyz

Apparently my cousin's best friend works marketing for Squid Industries and is Lucas's gf. So they sent me some stickers and some other goodies. Thanks Ashley!

6
1
submitted 10 months ago by cetan@lemmy.world to c/knives@sopuli.xyz

cross-posted from: https://lemmy.world/post/9936120

That's right, I've been at it again.

(And if you want to fast forward through all the foreplay and get right to the action you can download the models package here. Merry Christmas, ya filthy animals.)
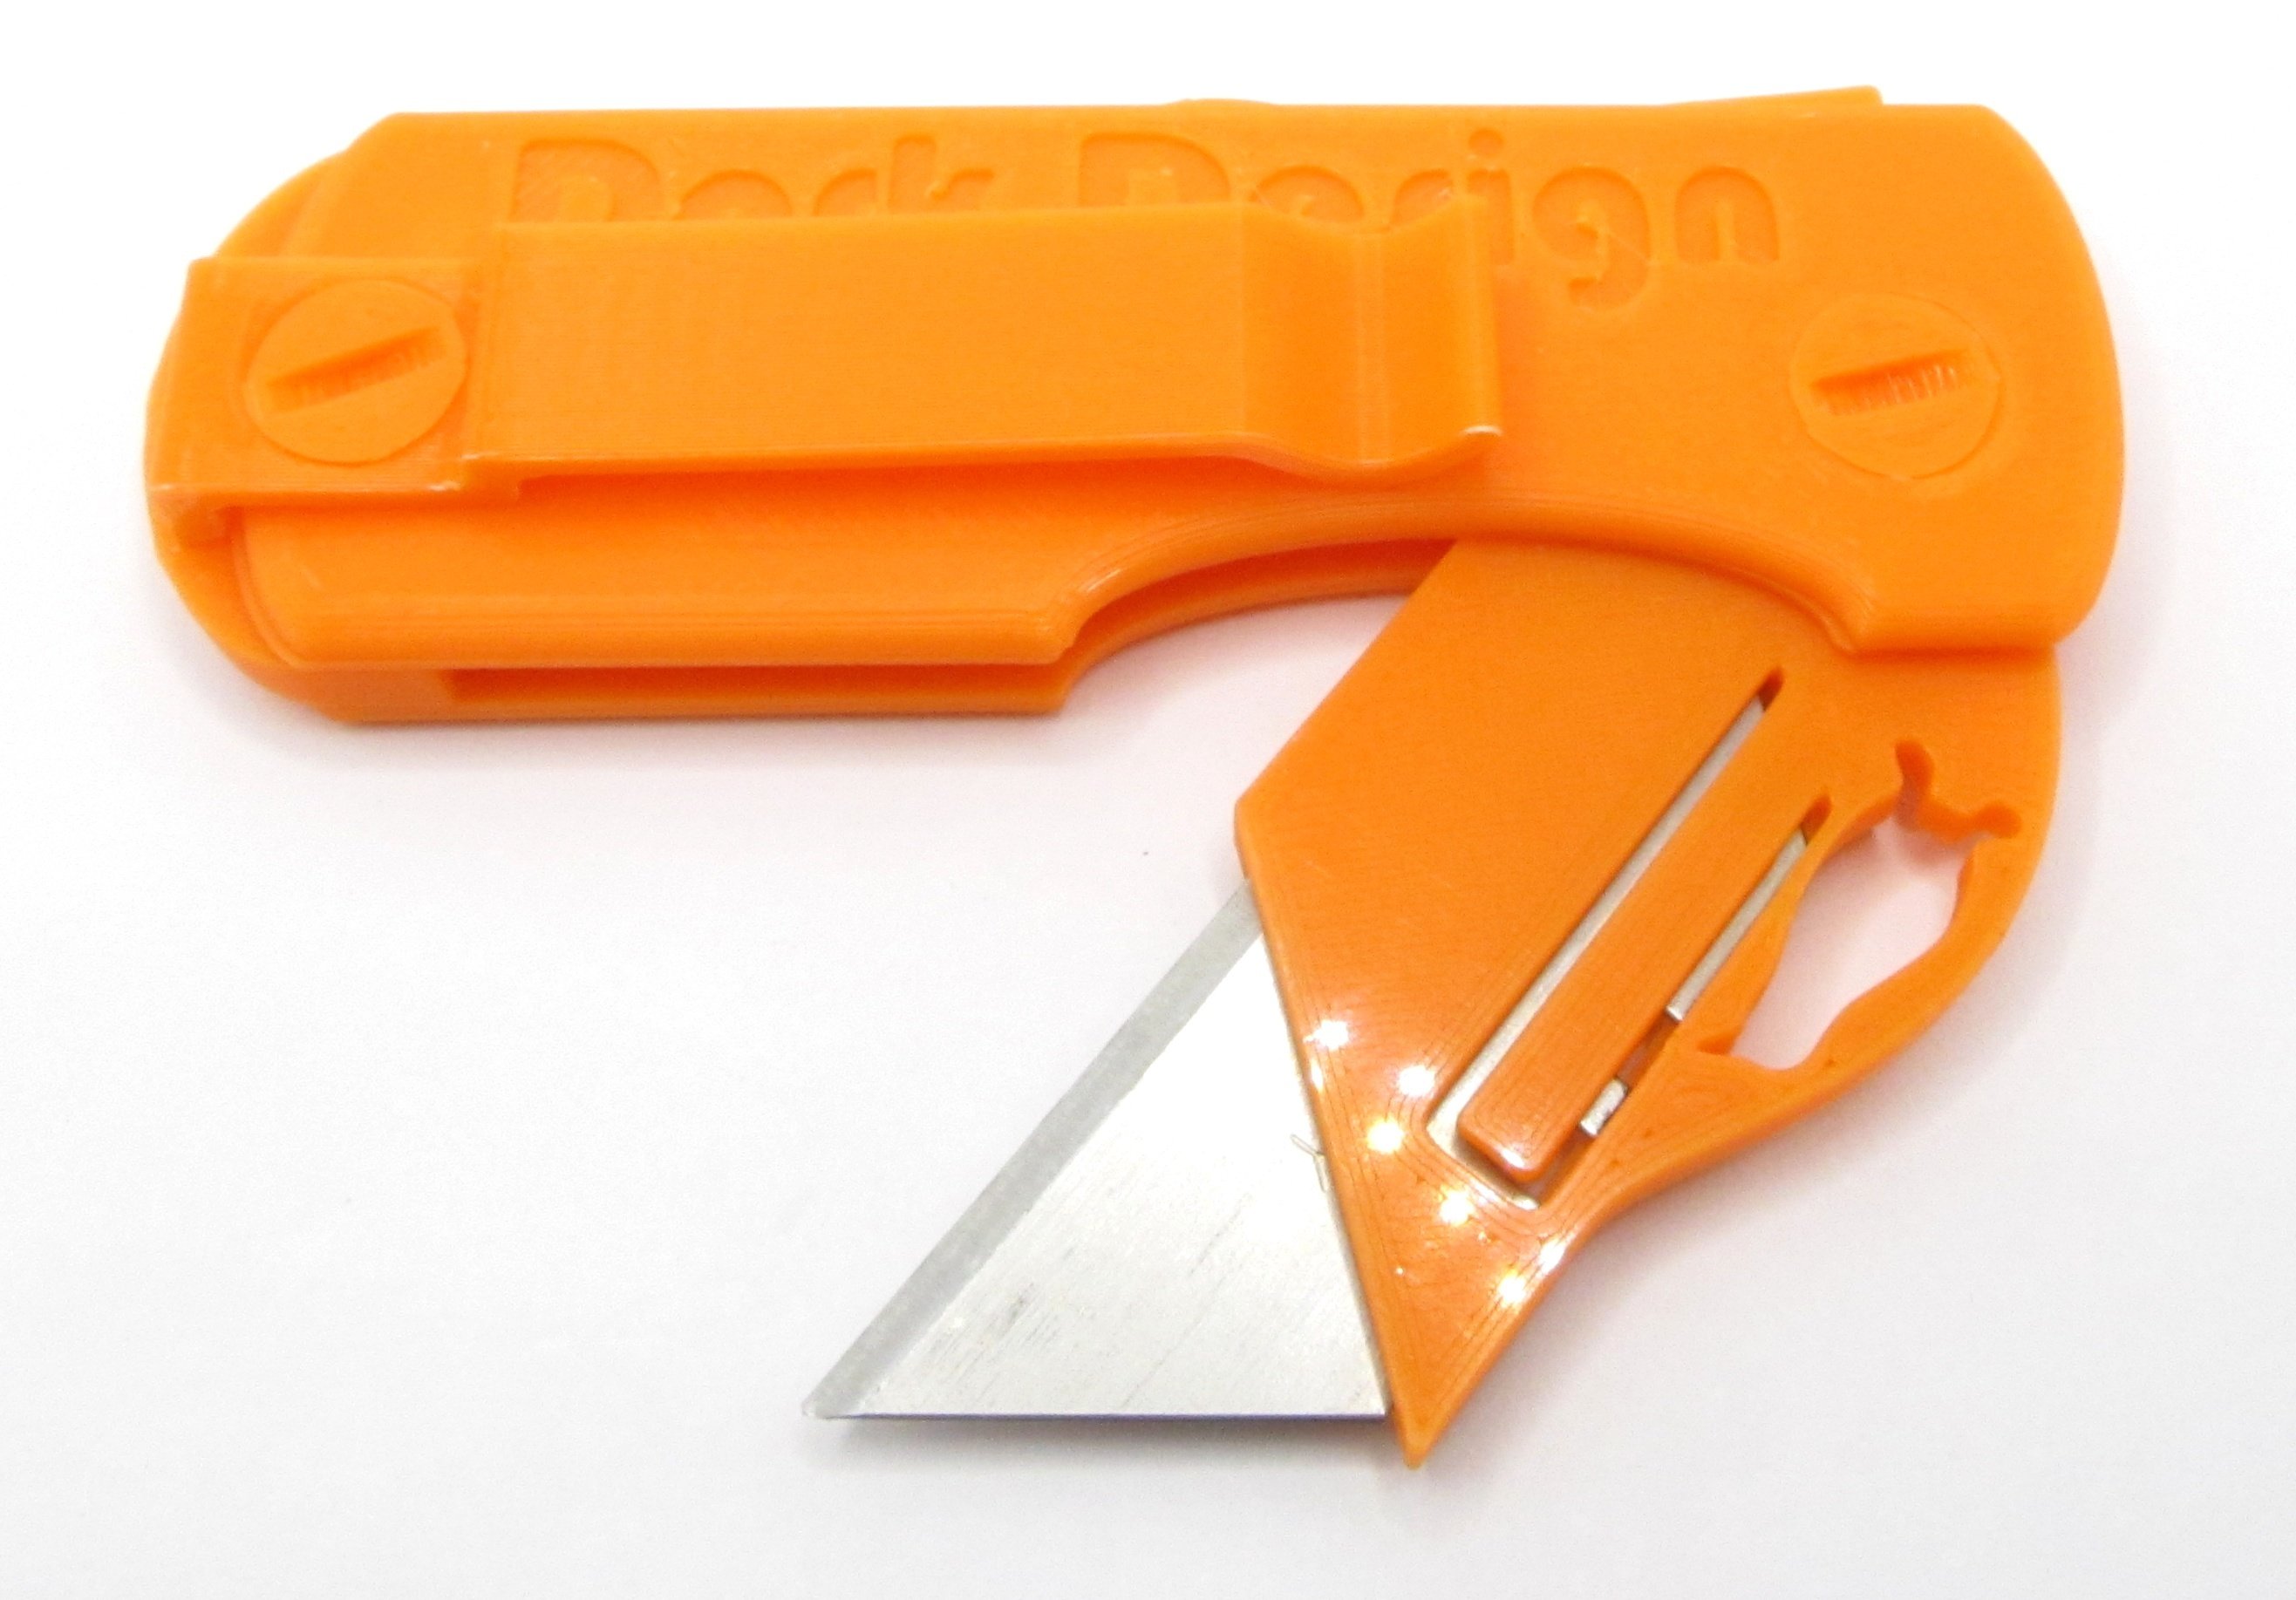
Here's a slightly more practical printable than the last one, which I'm calling the Sparrow.

This knife has the same design goals as before: Fully printable, with no external hardware except the Stanley utility knife blade, no supports, and mechanically as close to a real functional mechanism as is possible.
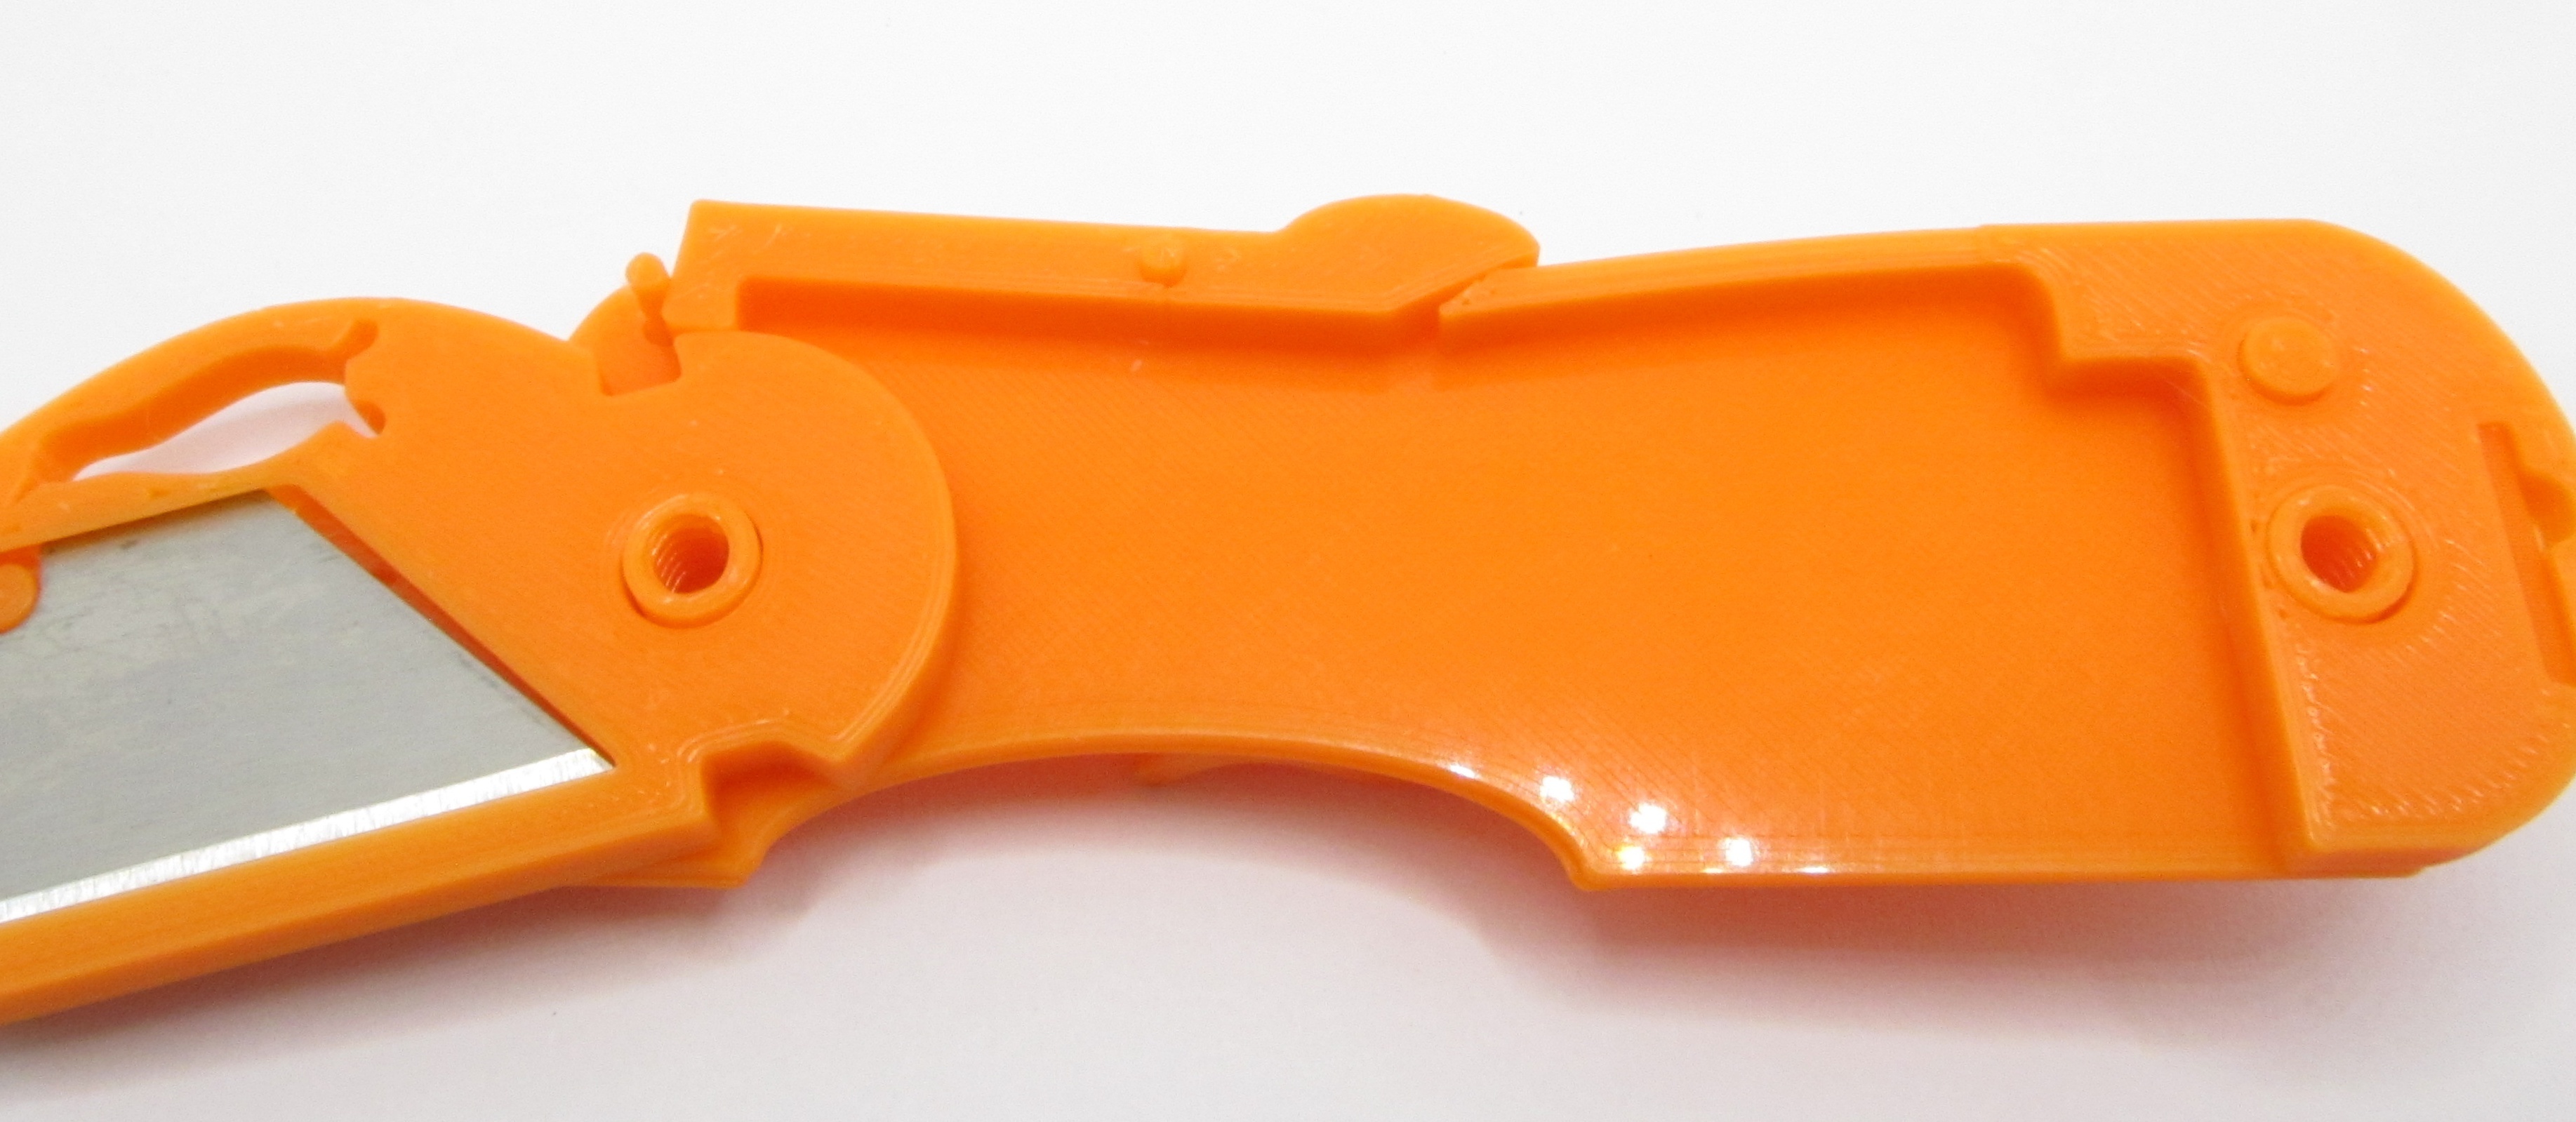
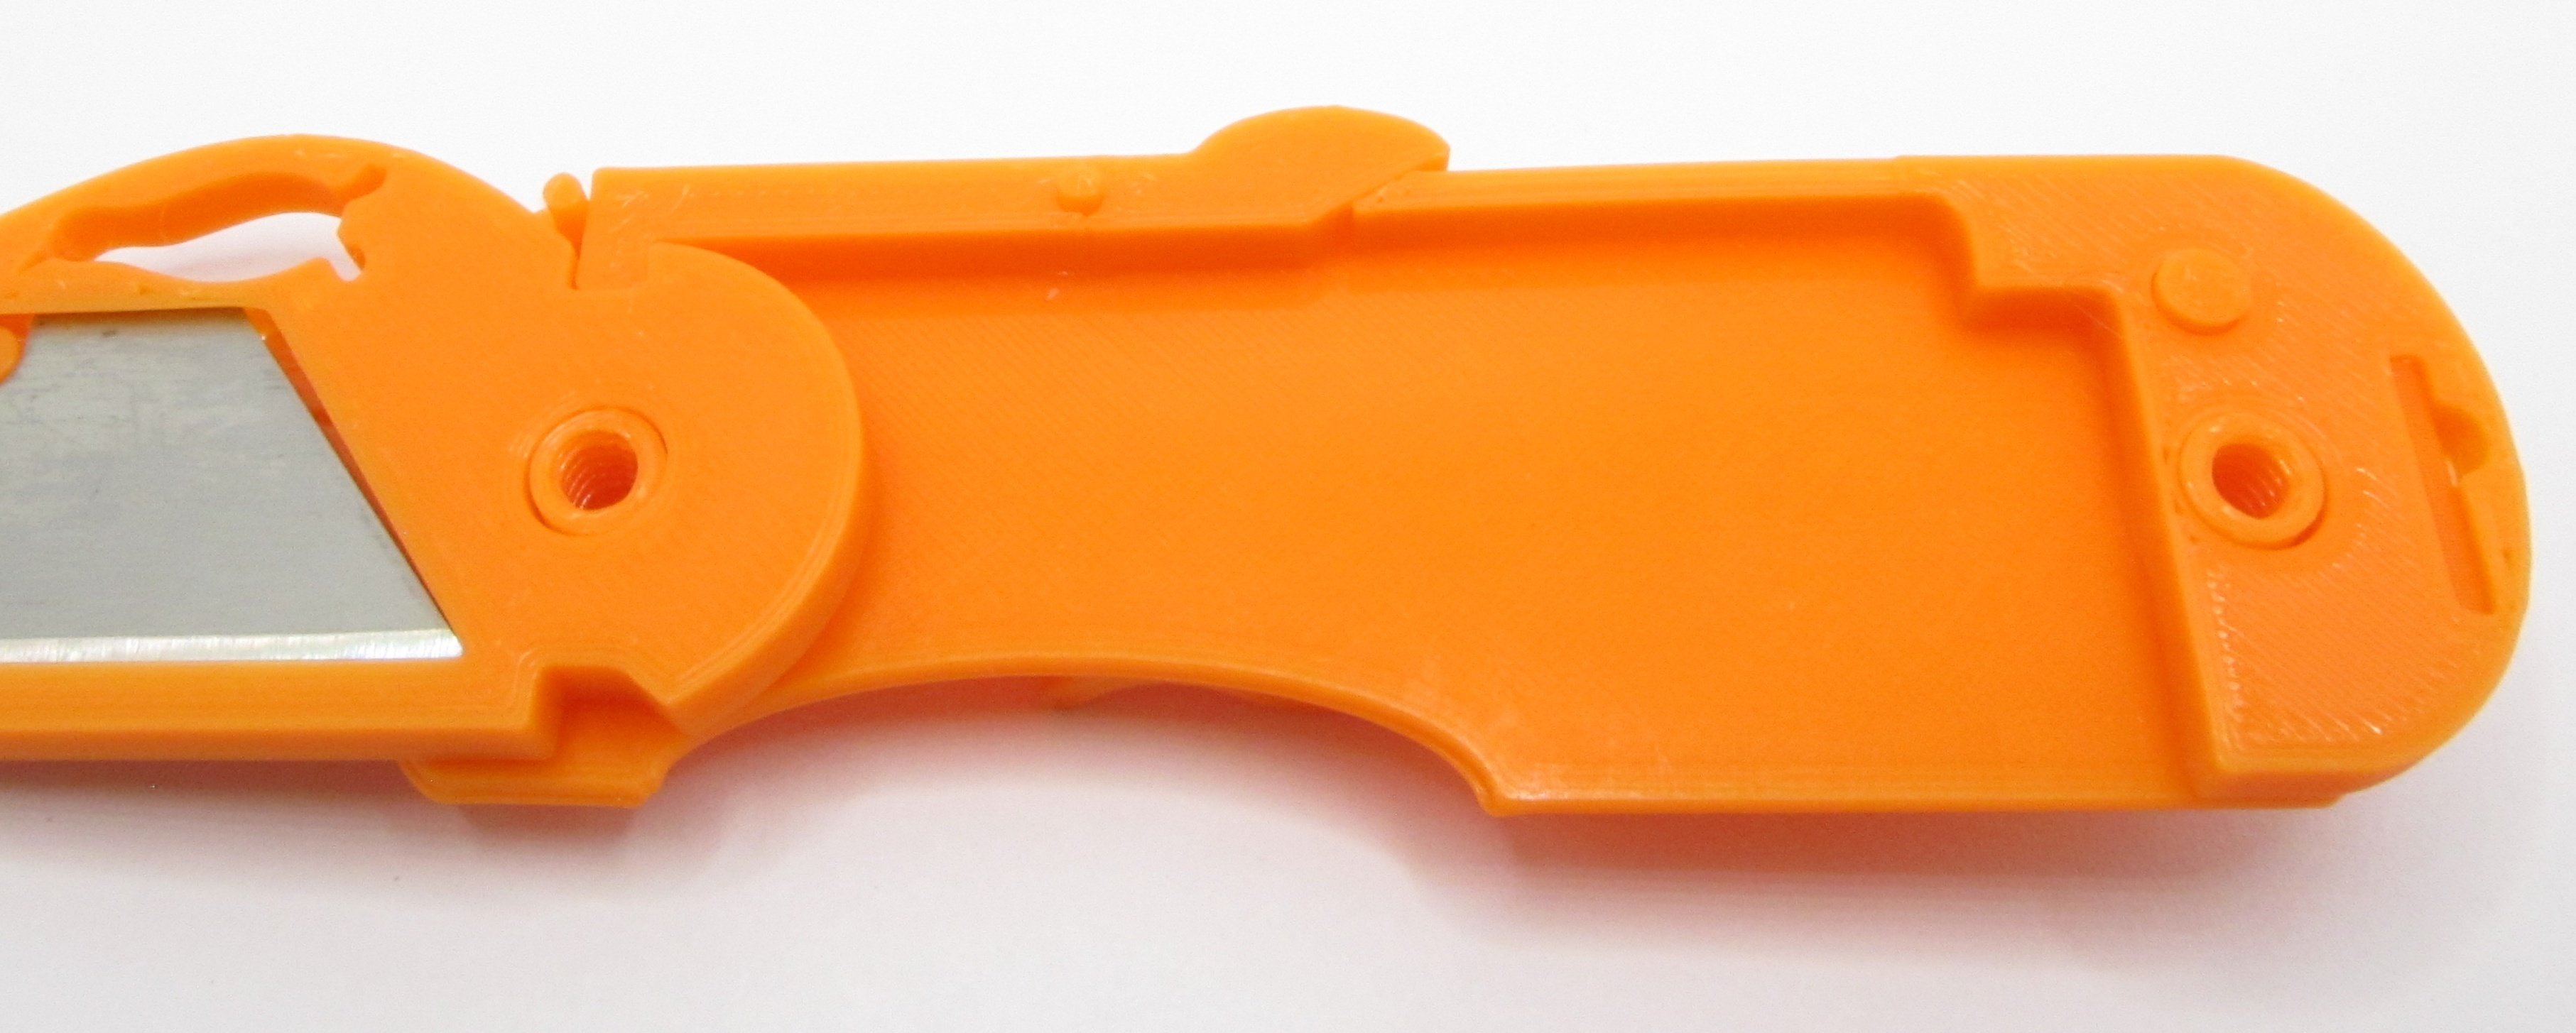
So it's a real working lockback folder. It locks up pretty good, too. Getting that working was one of those things that sounded really simple conceptually but actually turned out to be a pain in the ass to achieve. The mechanism owes a bit of credit to the Secret Of Show Business, via the wooden Spyderco kit we looked at a while back.

Oh, and making it in orange gives the the opportunity to do one of them there themed gear flat-lays that are so popular with the influencers nowadays.
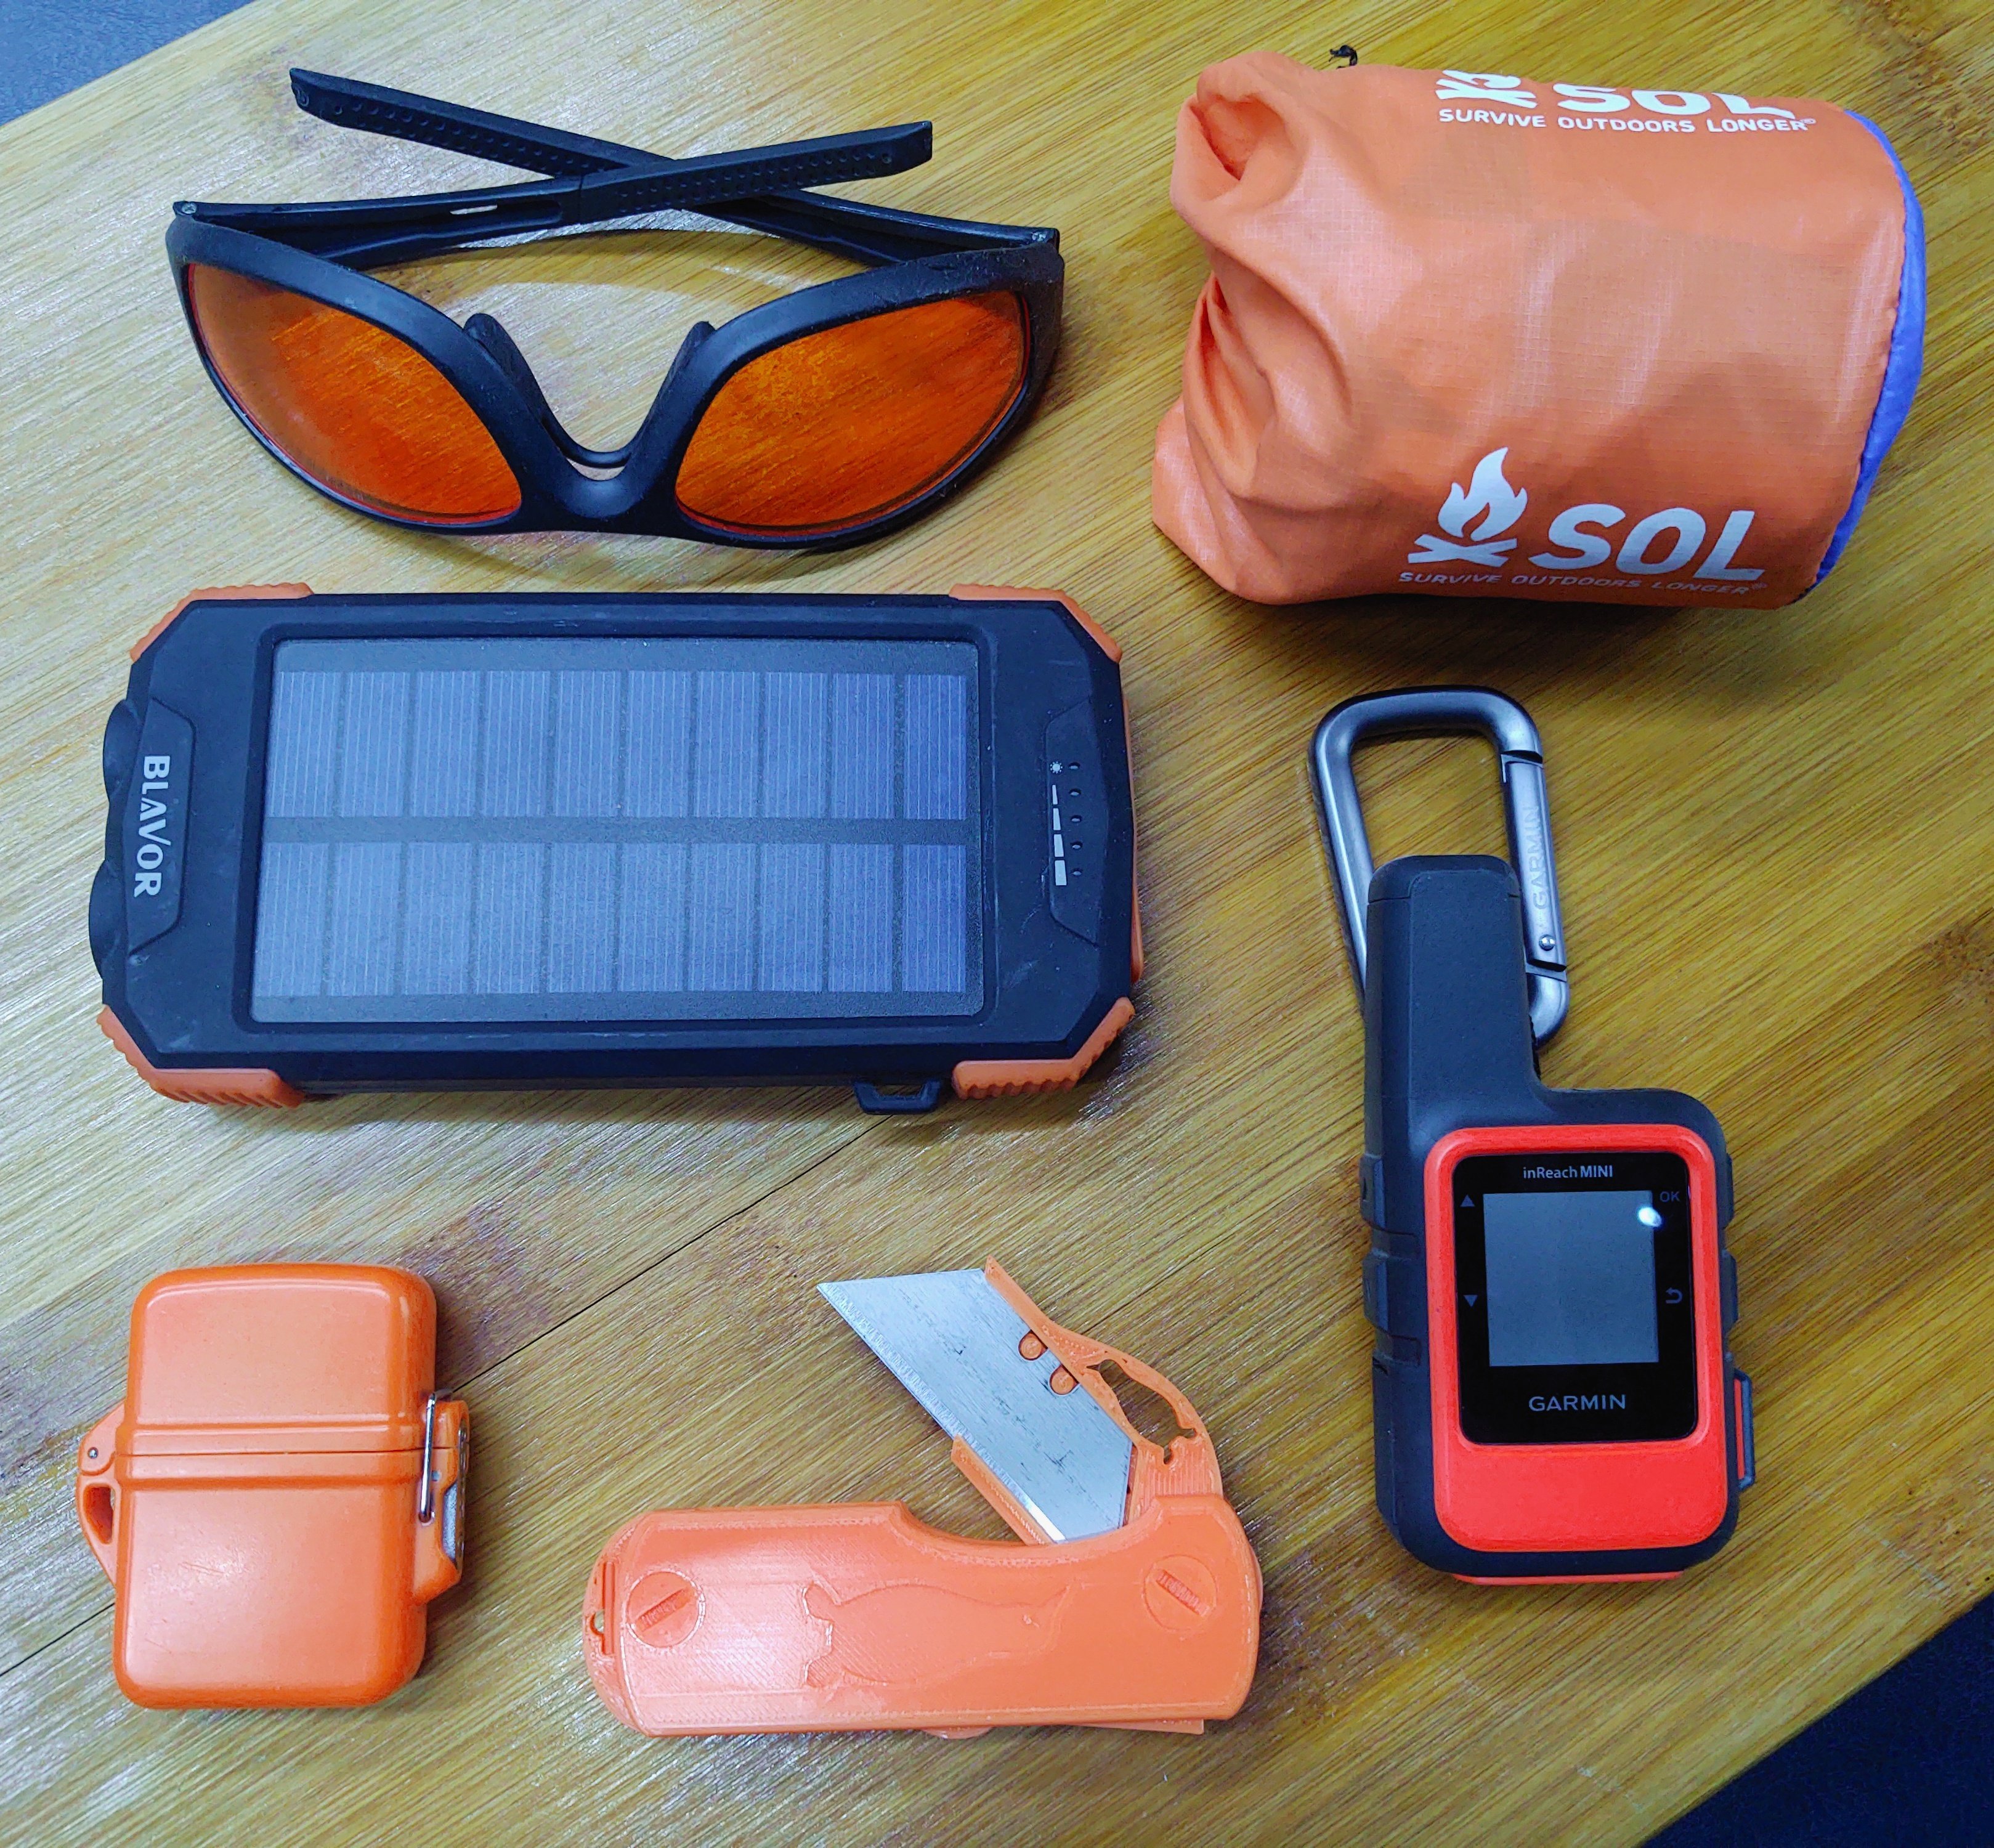
The Sparrow is a pretty pocketable EDC size at about 3-5/8" long when closed. It's noticeably shorter than my CQC-6K, but it's longer than a Gerber EAB because I can't cheat and use smaller diameter steel screws. A noticeable portion of its length at the tail end is just to accommodate the printed screw, which I can't make much thinner if I'd like it to continue to, you know, work.

Of course, it has a reversible pocket clip available as well.
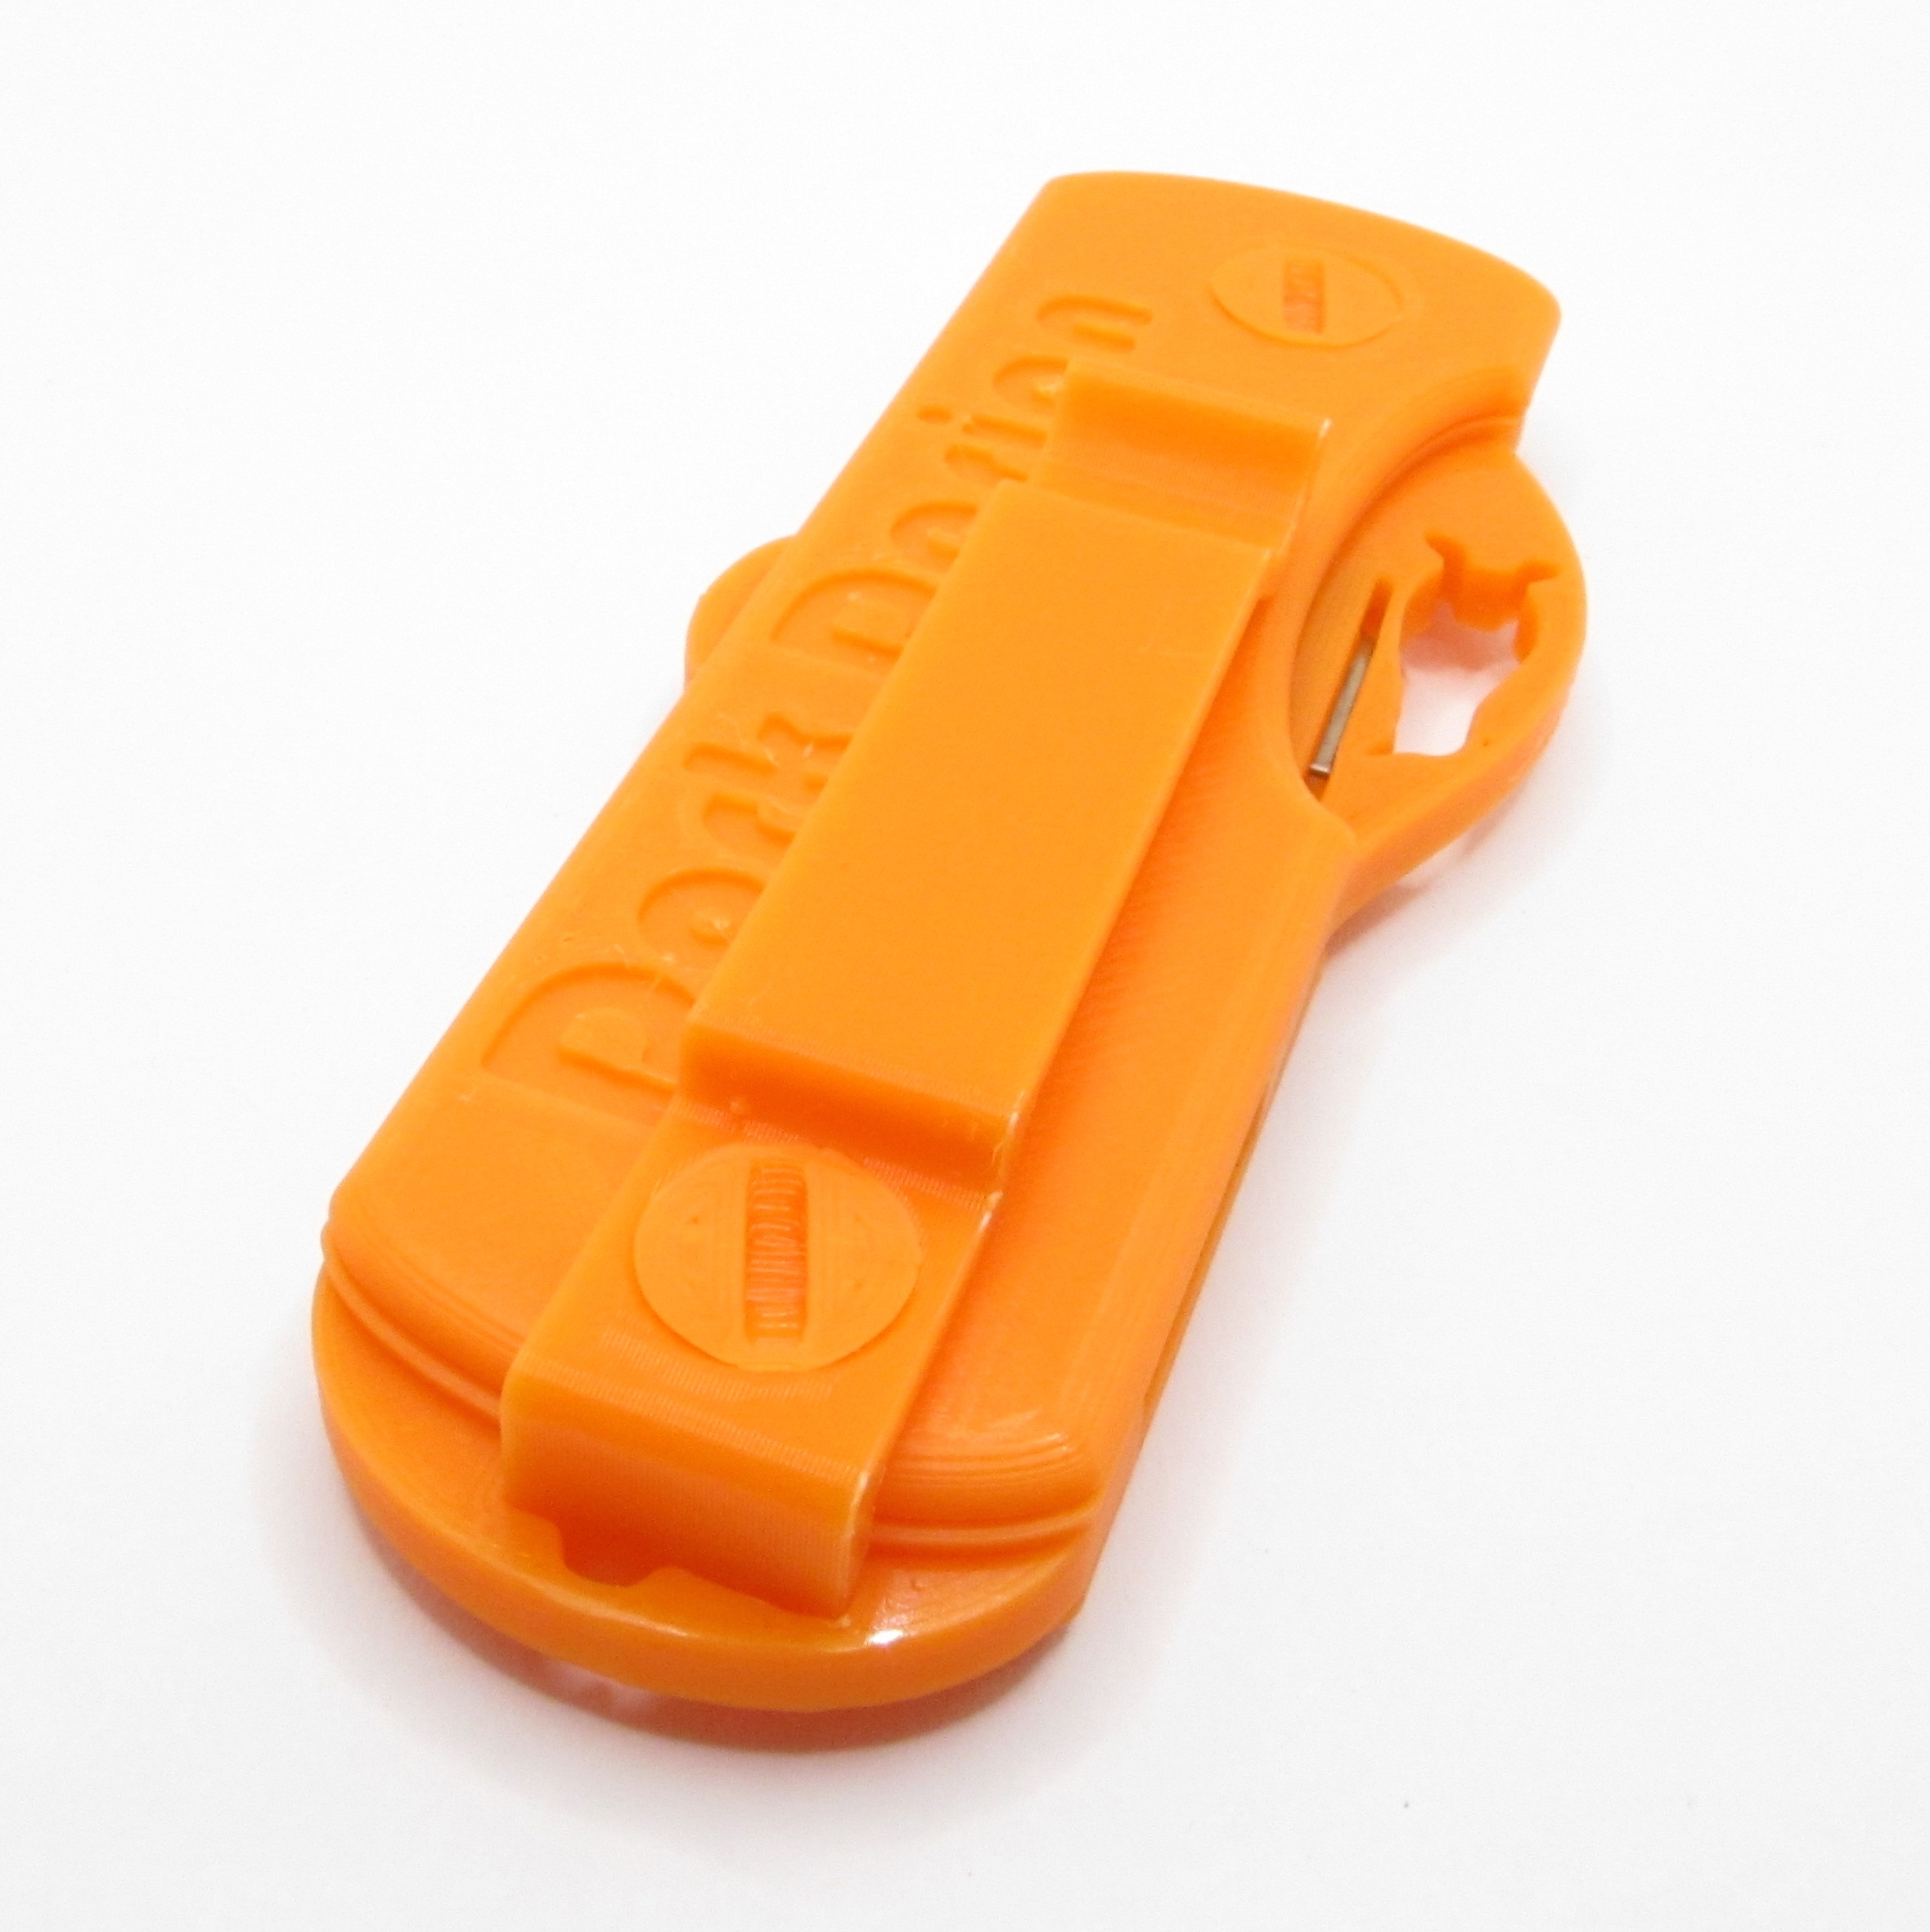
Sure, it's not as much fun to fiddle around with as a balisong knife. But I find the simple folding design a lot more practical for daily use. (I've been beating the shit out of my prototype, as is tradition, for a whole week at work before considering it "done.") Plus it's much less likely to draw the ire of the local constabulary if you happen to live in one of those countries with an unfortunate deficiency of bald eagles.

▓▓▓▓▓▓▓▓▓▓▓▓▓▓▓▓▓▓▓▓▓▓▓▓▓▓▓▓▓▓▓▓▓▓▓▓▓▓▓▓

Preemptive Burning Questions That Would Otherwise Inevitably Appear In The Comments

Q: Why are all the screws and pins separate parts? Don't you know you could simplify the design by making it all one solid lump?

Of course I know that. However, let's say you manage to break one of those titchy little 2mm pins. Would you rather re-print the entire monolithic handle liner assembly, or one 0.3 gram pin?

Q: But also making the handle scales separate was still totally pointless, right?

Sure, except this allows me to make a variety of scale styles available, including zooty skeletonized ones you can print in a complimentary color for two-tone aesthetics:
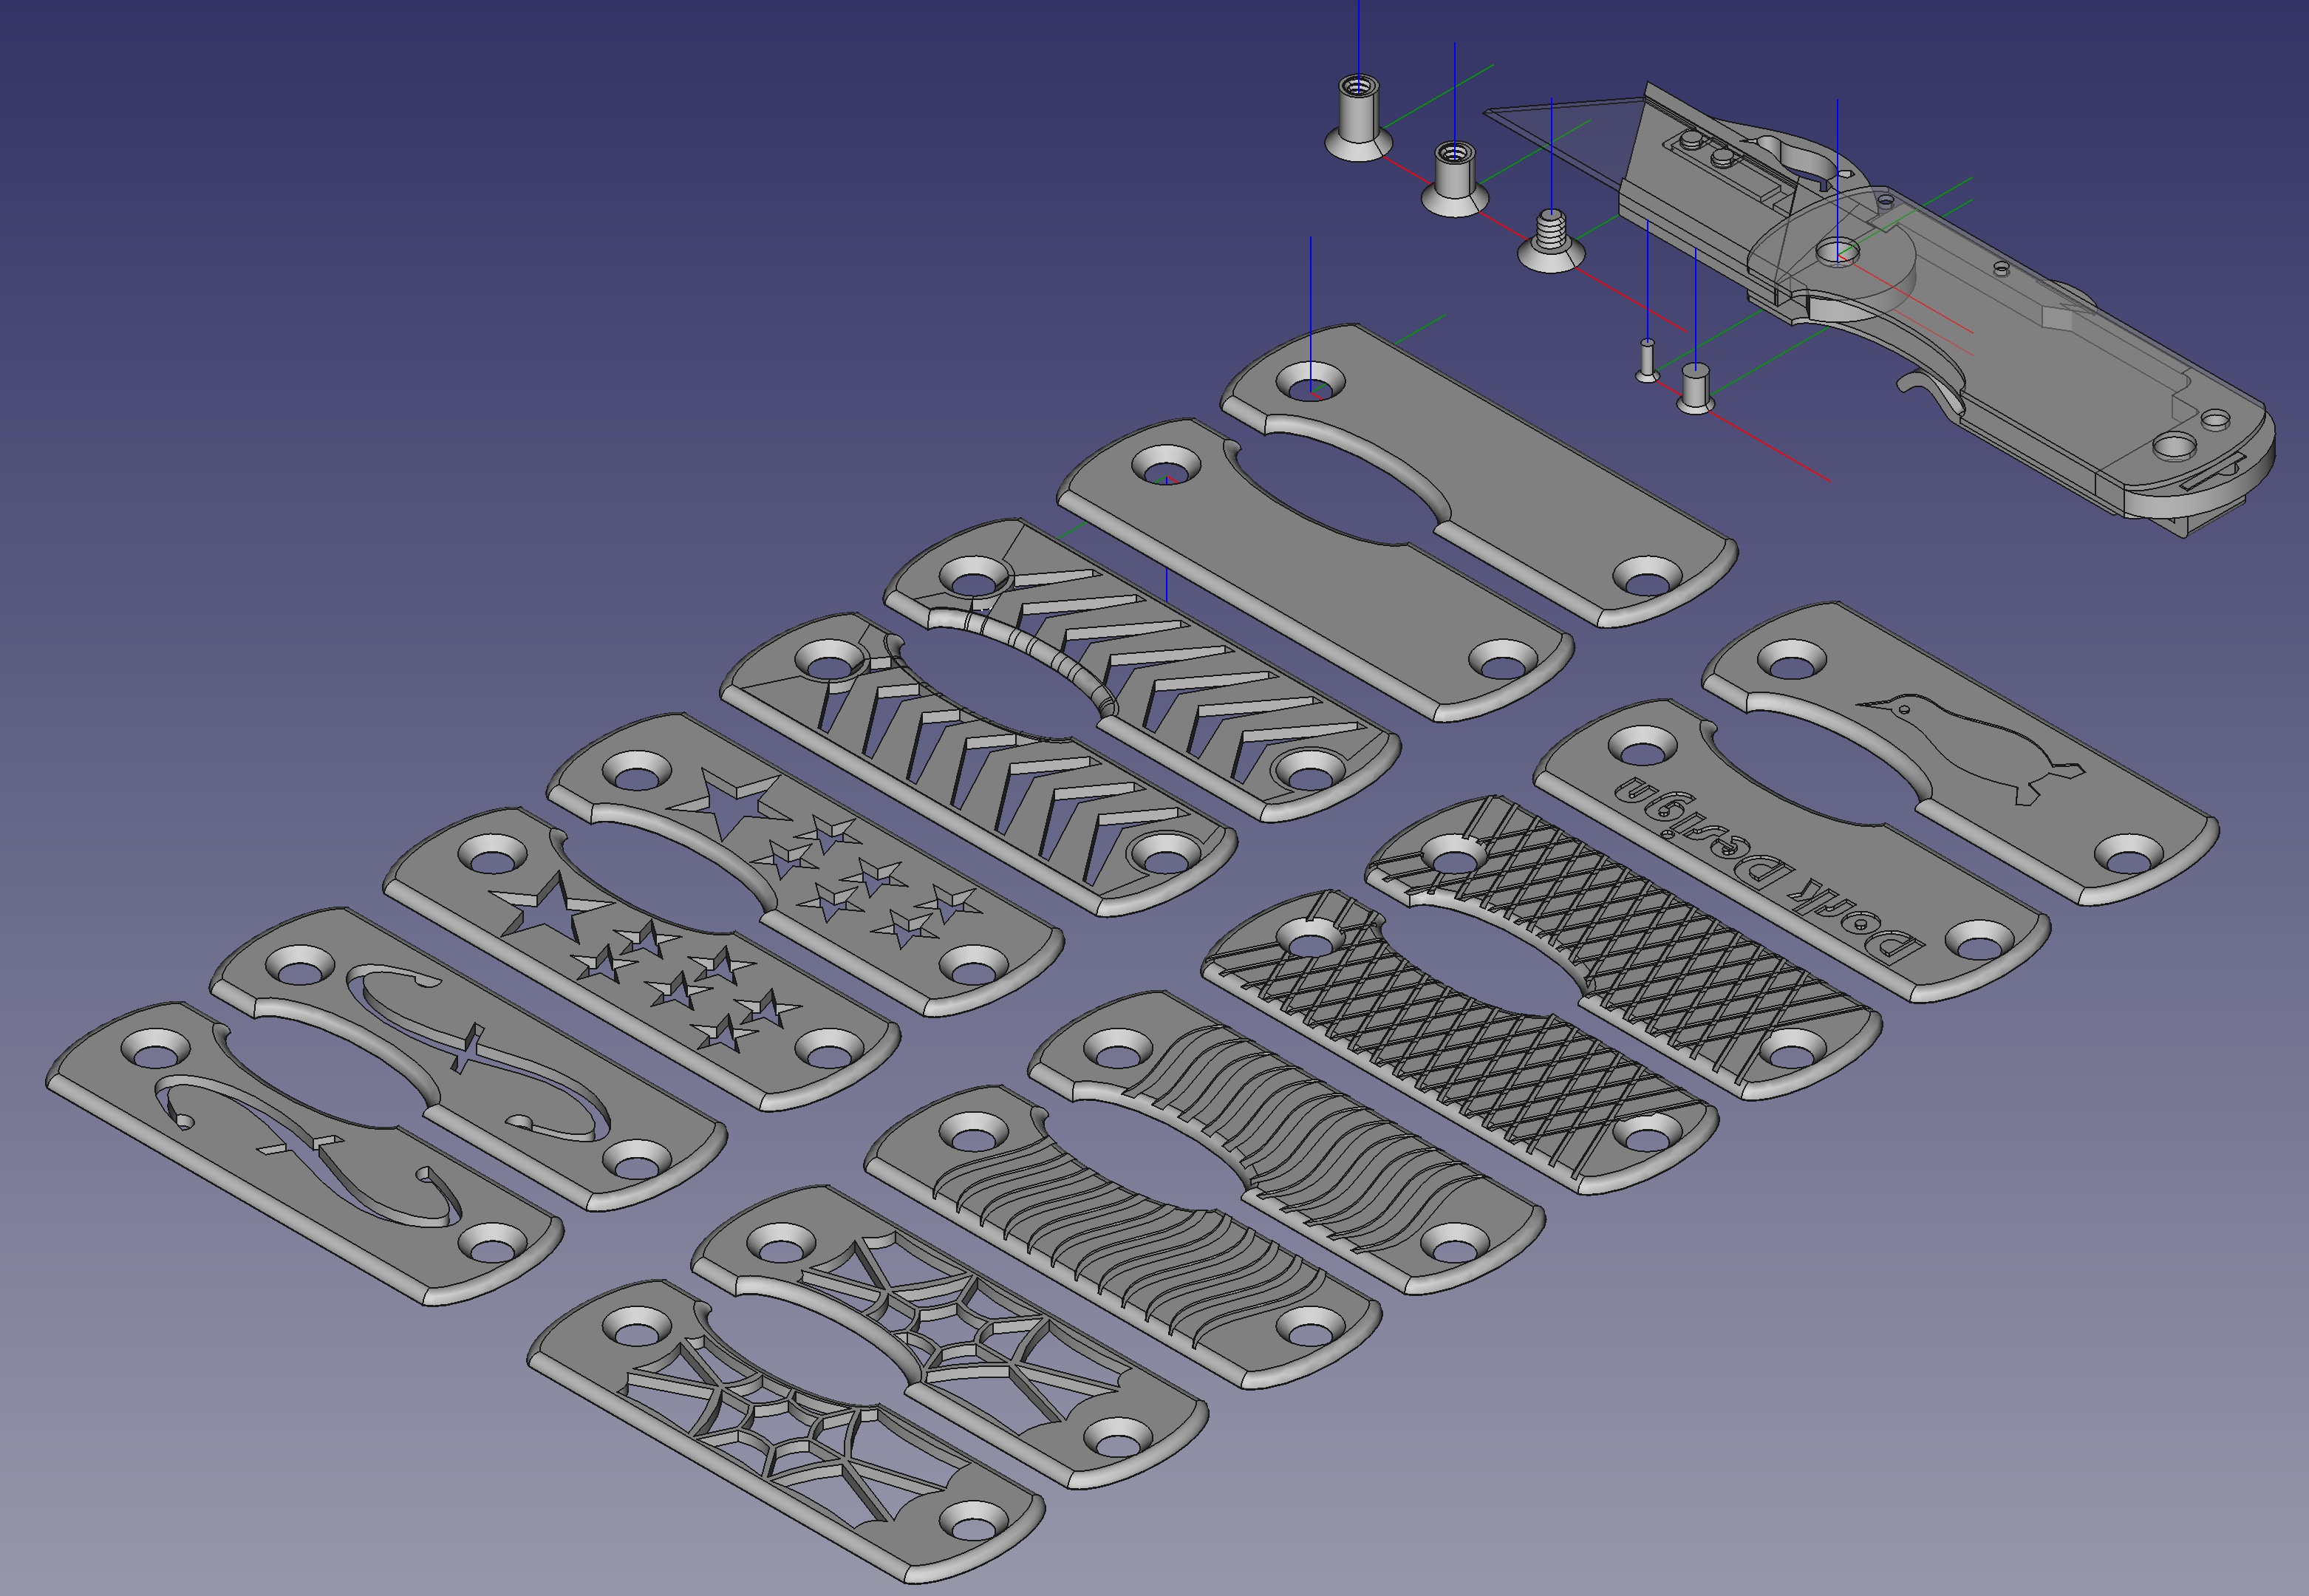
The possibilities practically suggest themselves.

Q: This is going to break instantly and you'll slice your fingers off. Printing something like this is so unsafe! I know this because I have done no math or testing whatsoever, but am an armchair expert!

Well, I clamped my prototype knife in my vise and yanked on it against its opening axis with a dial scale until it broke. You know, for science.

The major markings on that scale are 5 pound increments, by the way. It gave a noticeable warning creak at 37 pounds, and finally broke with the dial indicating 39 pounds. It was only made out of ordinary PLA. As you can see, I actually had to adjust my grip and I was bracing my foot against the bottom of my workbench to be able to put enough oomph into it to break it. If you torque your box cutter at nearly 40 pounds in day-to-day use I suggest you're probably using it wrong. Provided you don't try to use this knife as a crowbar or a piton I really don't think you'll have anything to worry about.

Q: What's with the dumb bird on everything?

He's a penguin. Don't be dissing my penguin, man.

▓▓▓▓▓▓▓▓▓▓▓▓▓▓▓▓▓▓▓▓▓▓▓▓▓▓▓▓▓▓▓▓▓▓▓▓▓▓▓▓

.STL Files Download: Here.

As before, the above is provided as-is and with no guarantees, and you are free to make your own or give printed knives away to friends or family or what have you, but prints of my models are not to be sold and not to be uploaded or reposted to any model repository or anywhere else outside of the Lemmy-sphere.

▓▓▓▓▓▓▓▓▓▓▓▓▓▓▓▓▓▓▓▓▓▓▓▓▓▓▓▓▓▓▓▓▓▓▓▓▓▓▓▓

Assembly Instructions and like a million pictures As Follows:

People with no interest in printing or assembling one of these can stop reading now. I promise I'll go back to my usual program of loquacious show-and-tell/point-and-laugh over various whackmobile novelty knives in my subsequent posts.

Anyway, you will need to print this small mountain of components.
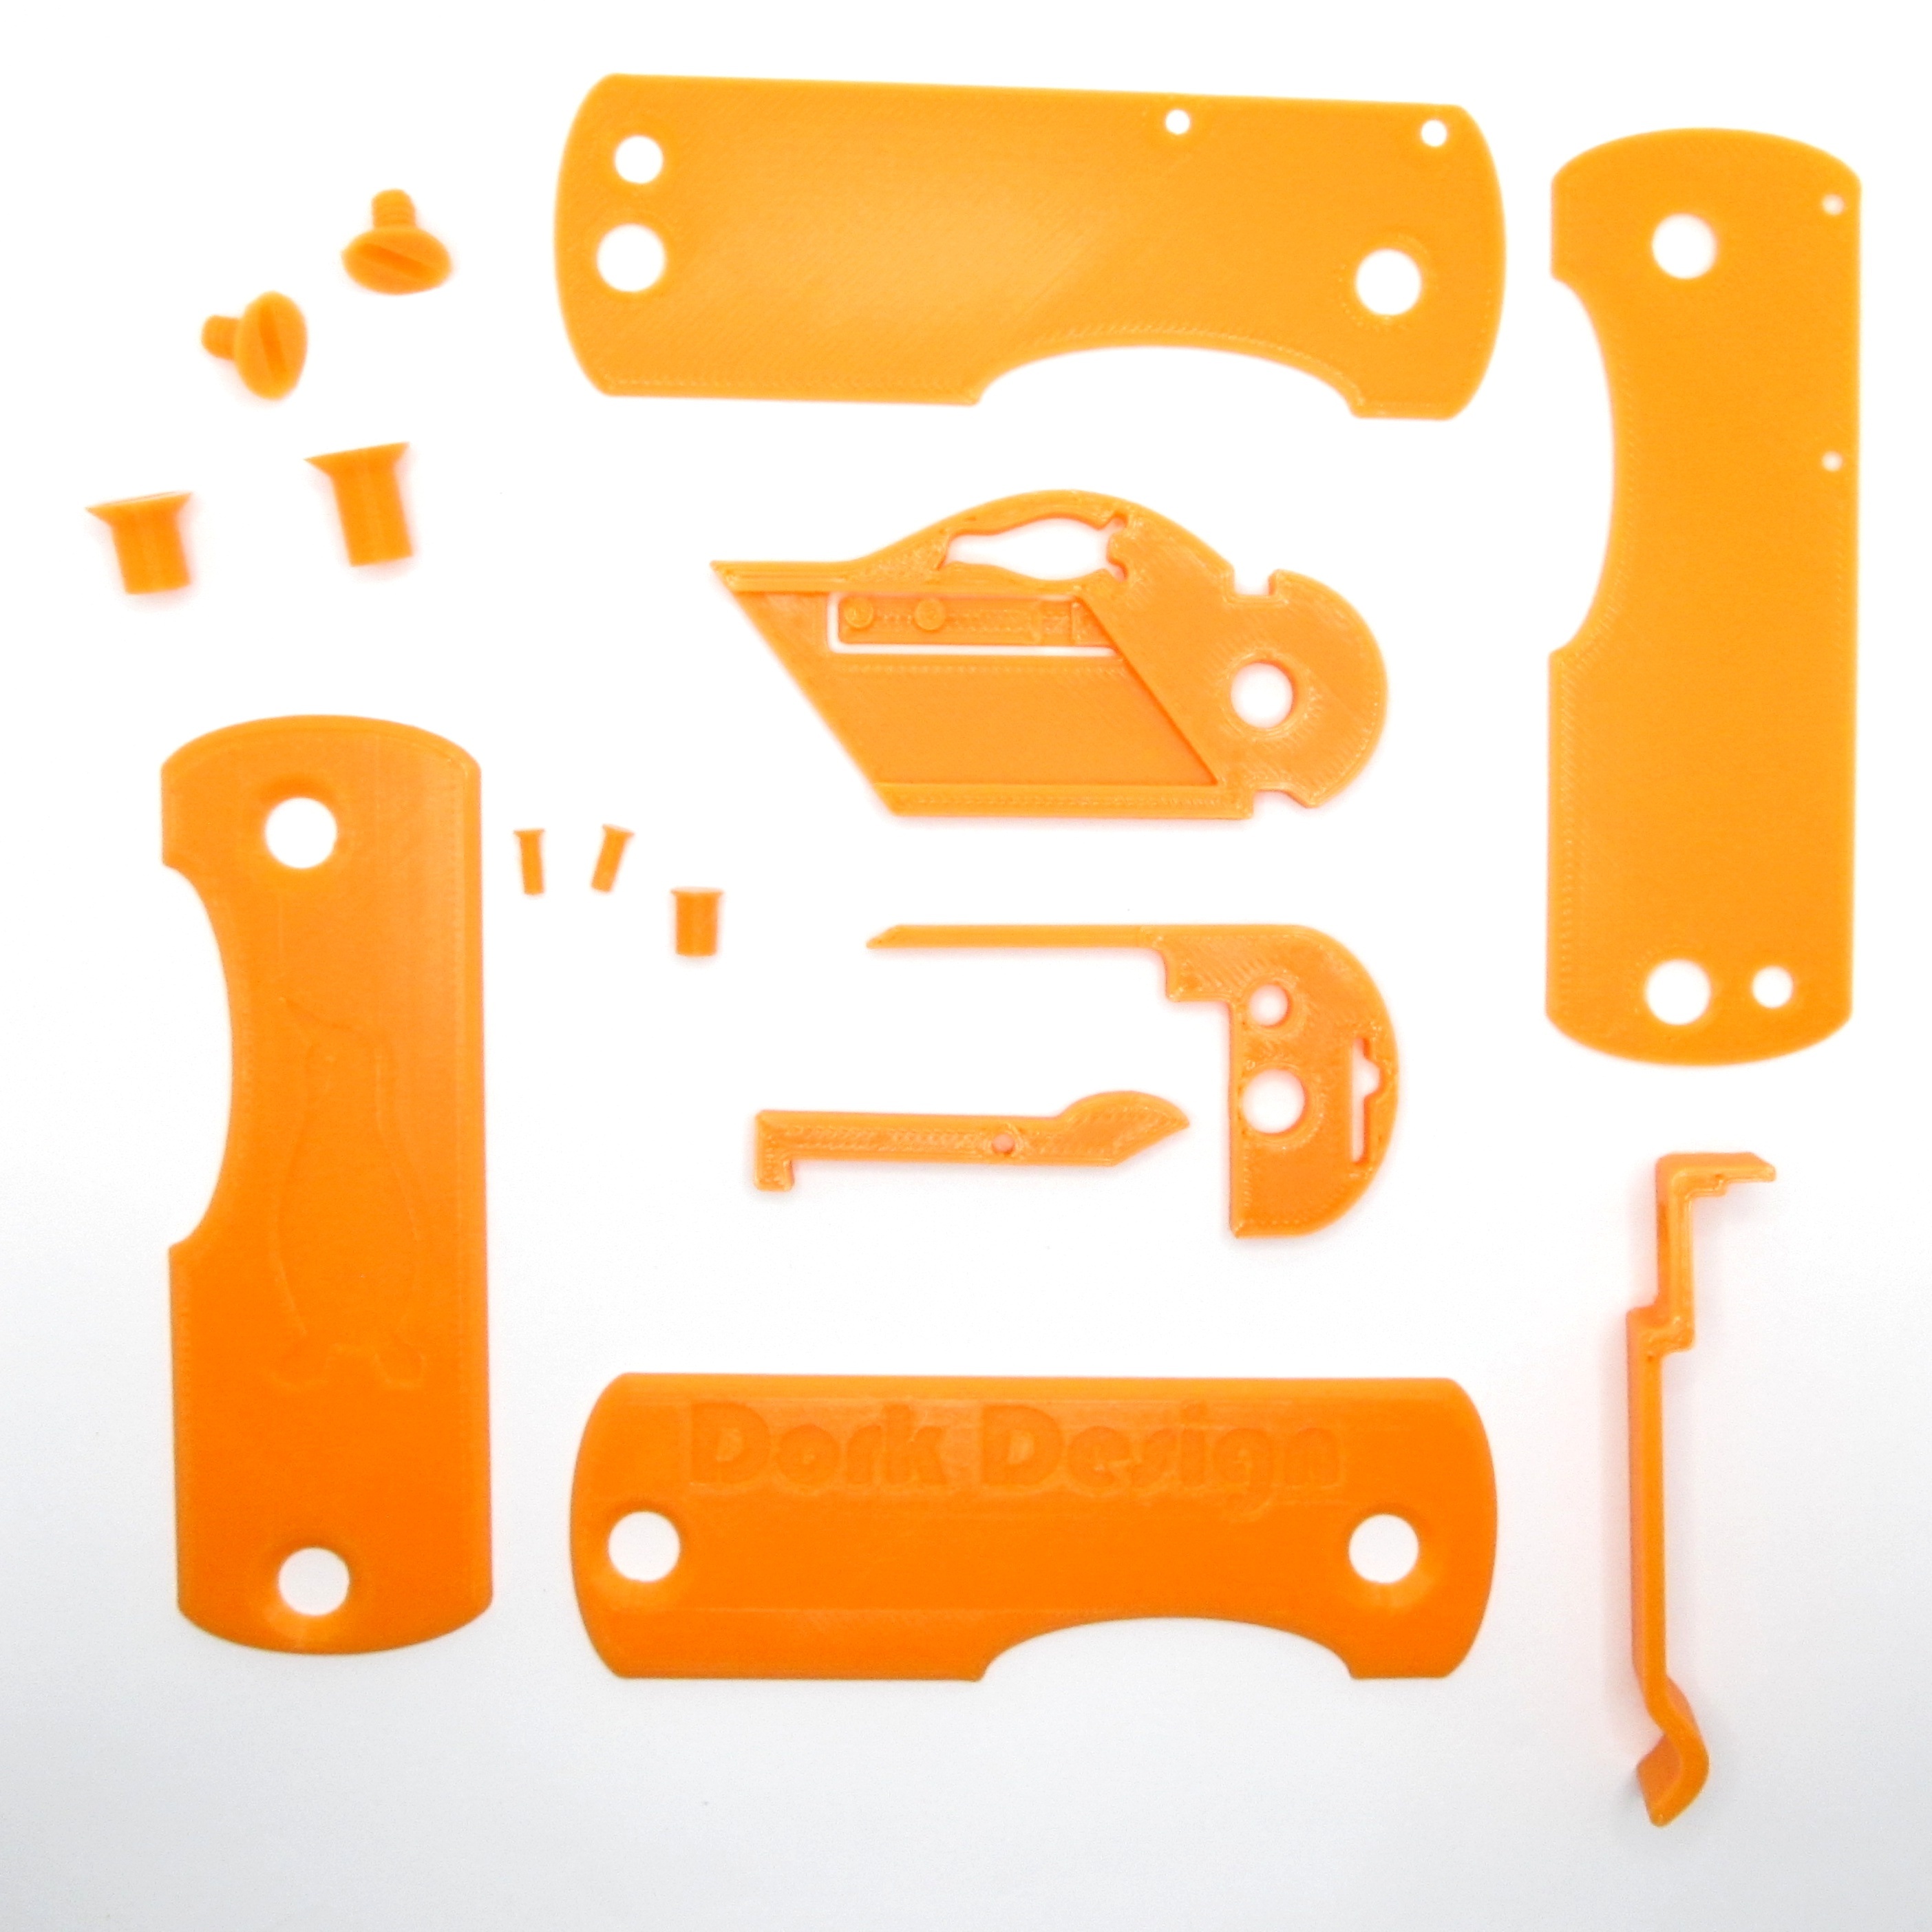
The complete bill of materials is as follows:

  • 1x Blade Holder
  • 1x Top Liner, 1x Bottom Liner
  • 1x Lock Bar
  • 1x Spring Block
  • 2x Female Screws
  • 2x Male Screws
  • 2x 2mm Pins
  • 1x 4mm Pin
  • 1x Top Scale, 1x Bottom Scale of your choice
  • If you want to use the clip, you need 1x Pocket Clip, and replace 1x of the short female screws with the longer one included, labeled "for pocket clip."

Several components are quite close fits, and various pins and screws need to fit through their respective holes. If your printer produces parts with a lot of elephant's foot on the bottom you'll probably have to trim the inside edges of the holes with a utility knife blade, which is something I should hope you'll have to hand when embarking on this project...

Start with the bottom liner. You can identify it as the one with the chamfered holes for the pins, which you'll notice have flared heads.

Stick the 2mm pins and the 4mm pin through. They'll sit flush with the underside of the liner. If they don't, you have some trimming to do. Then sandwich your bottom handle scale underneath that. The scale will keep the pins from falling out.
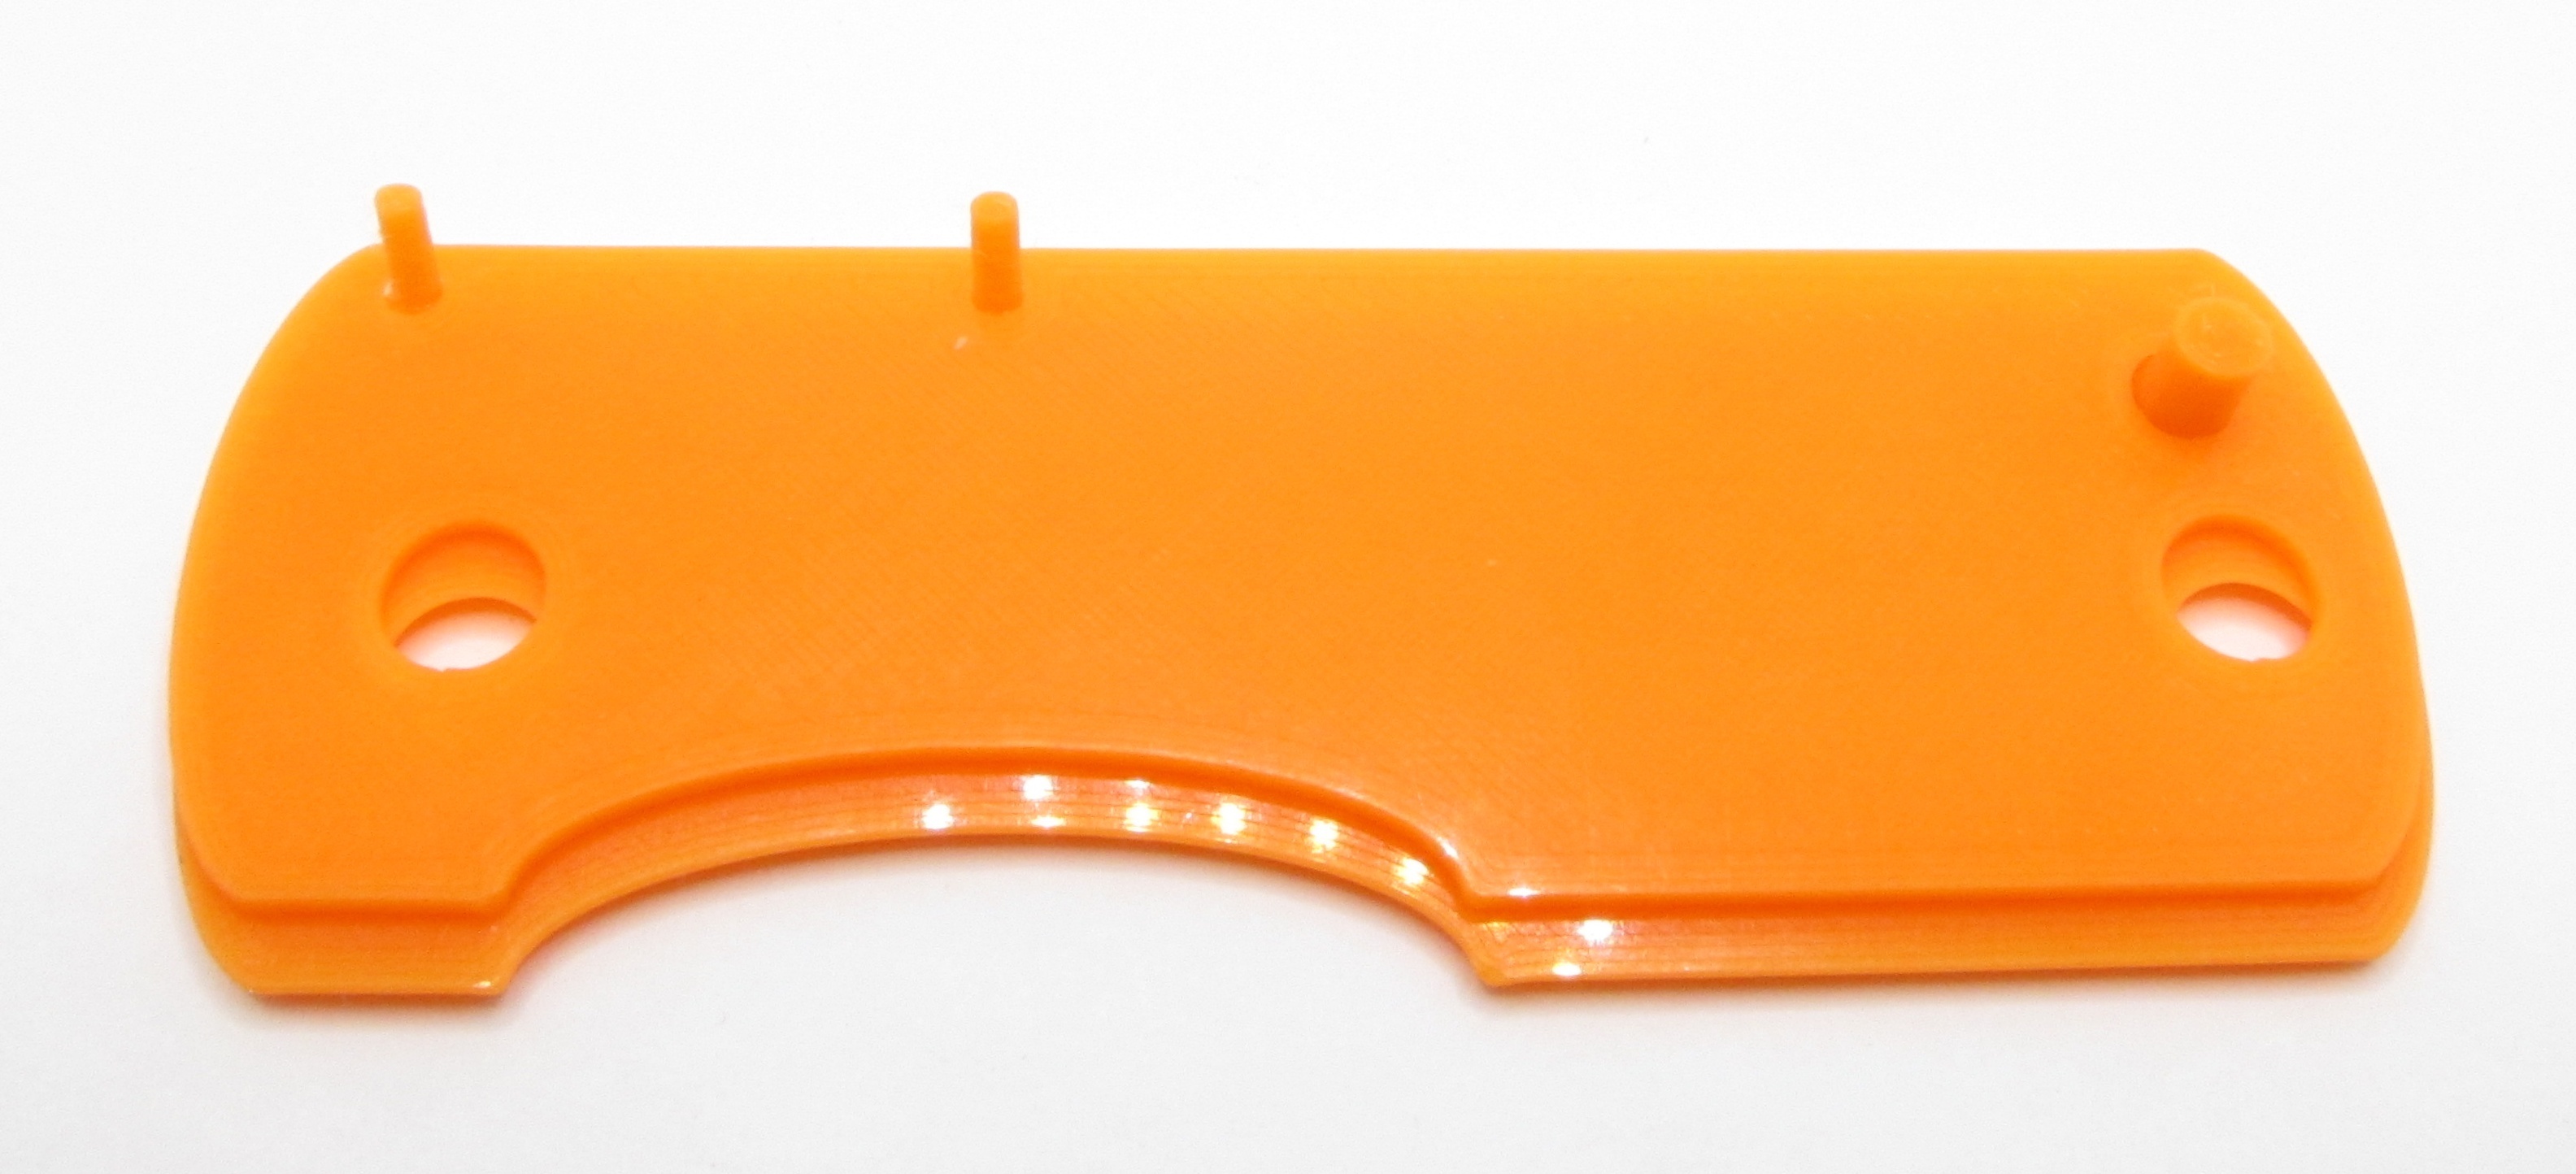
Then identify your screws. There are two screw lengths, and if you're going to use the pocket clip you'll put the shorter one through the front where the blade goes on, and the longer one through the tail where the clip will go. If you're not going to use the clip, just employ two short screws instead, one on either end.
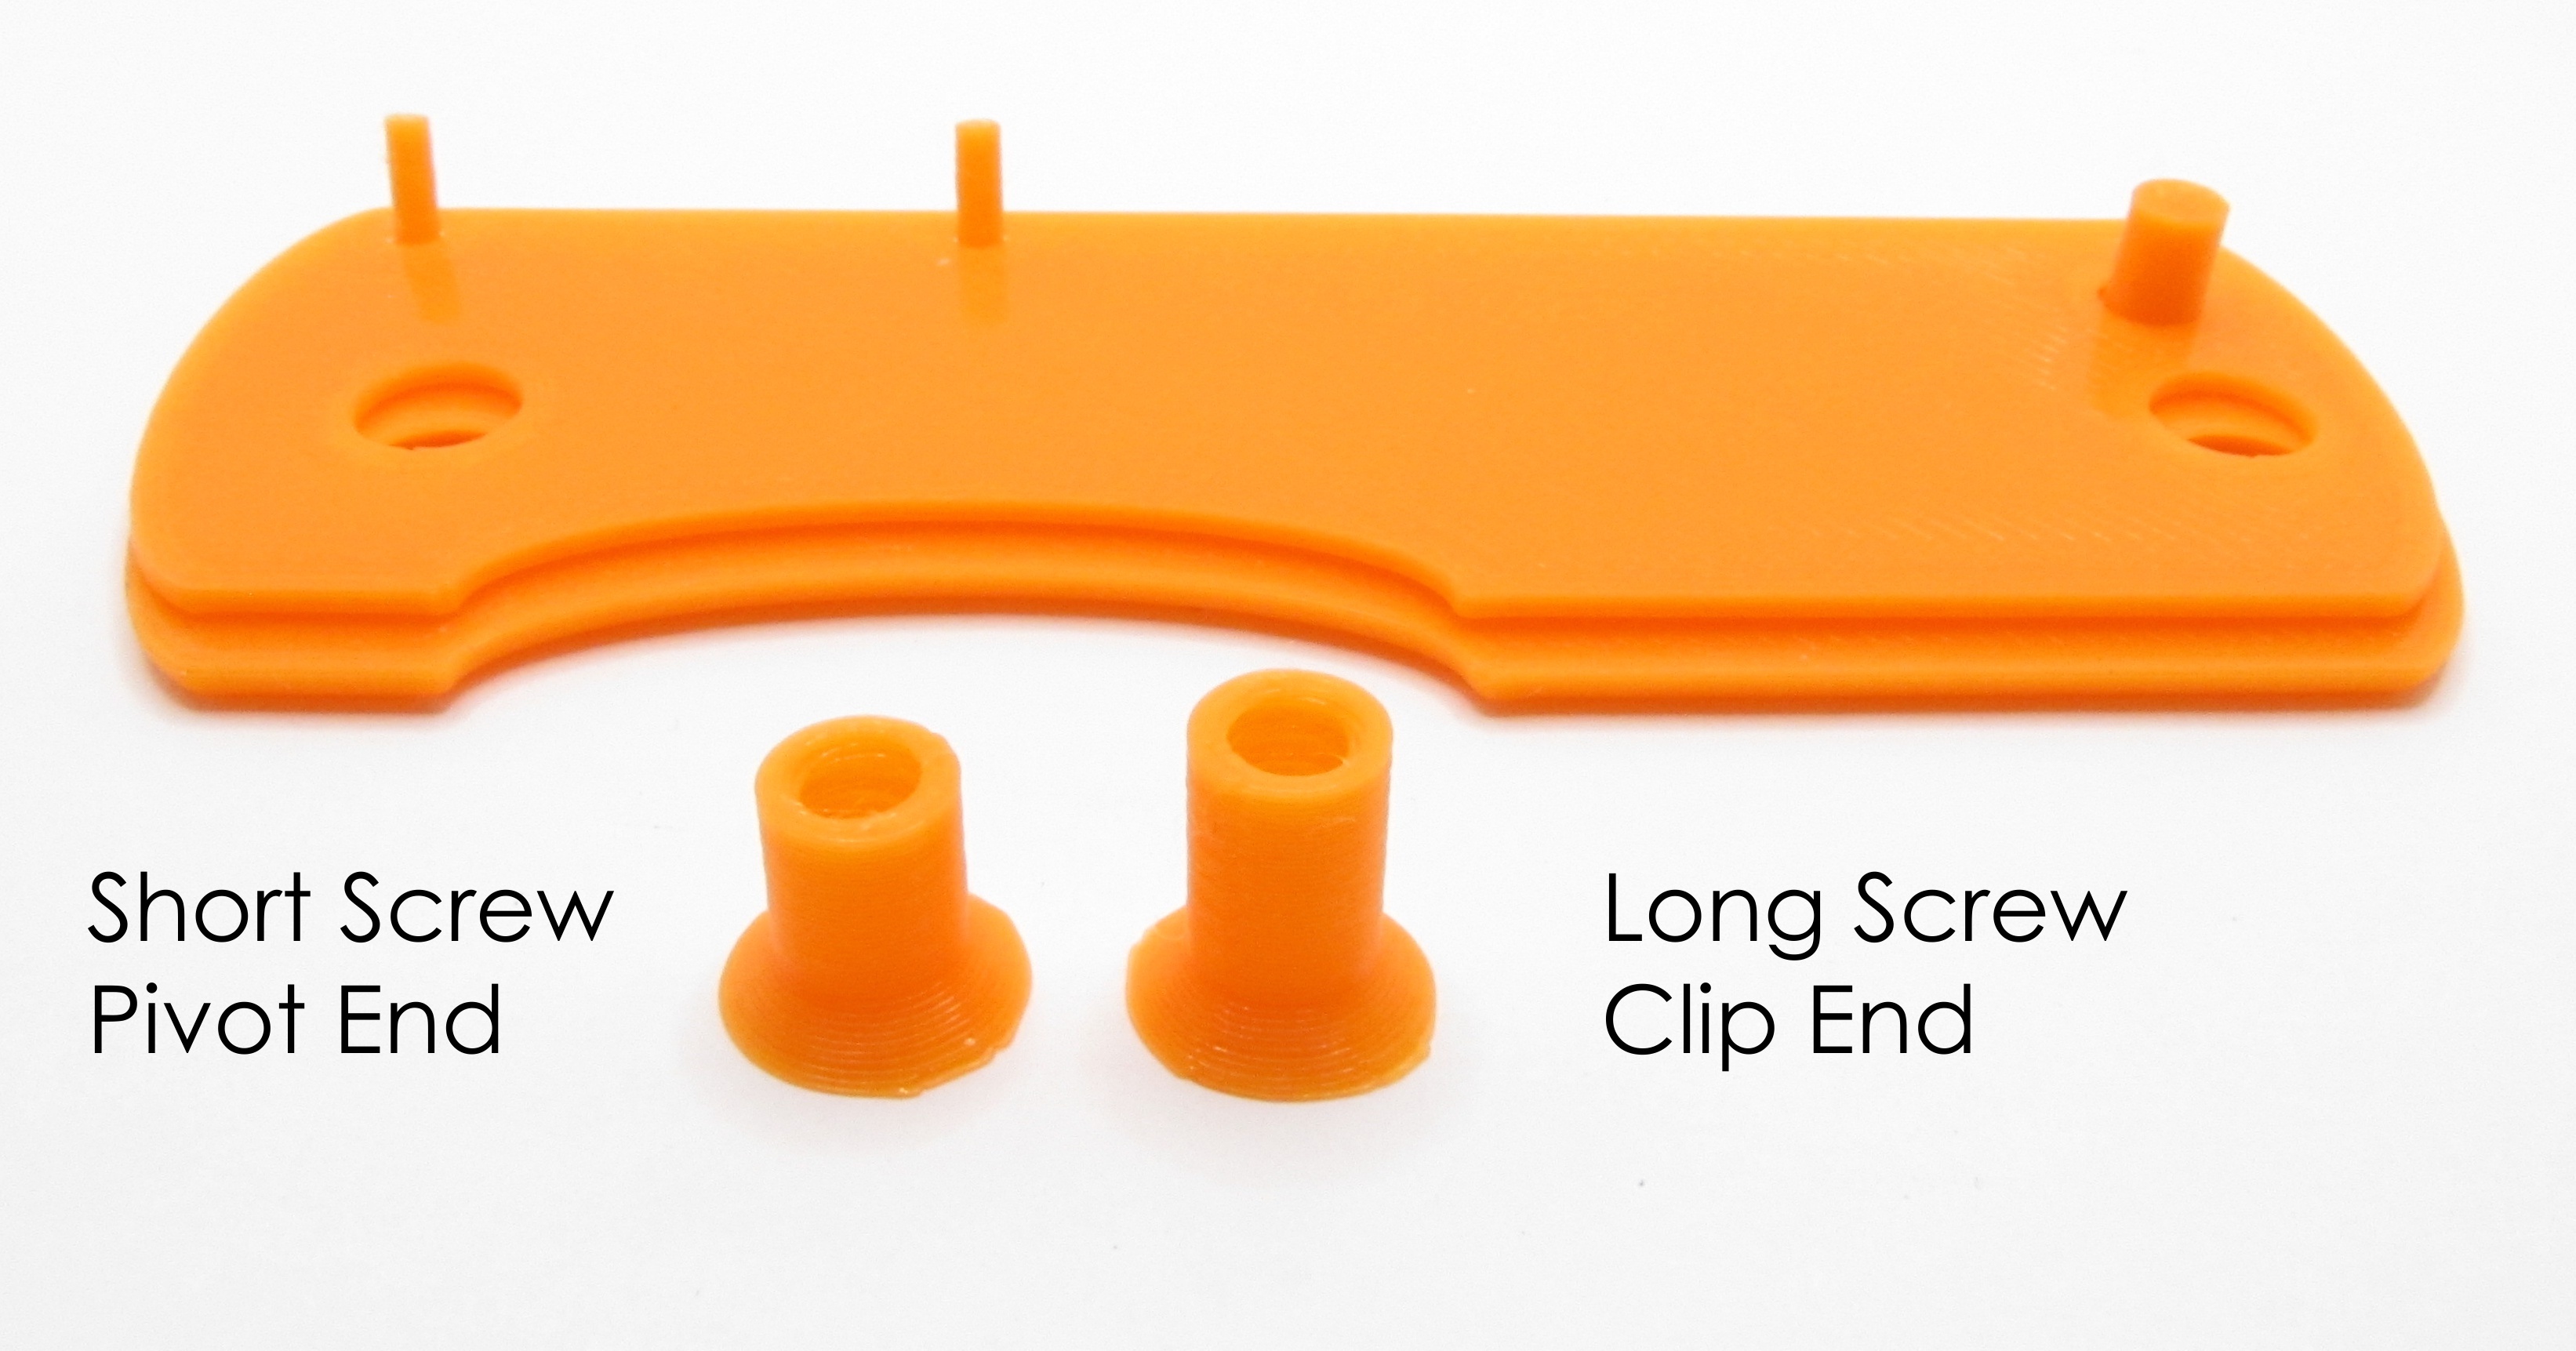
Either way, stick the female screws up through the entire sandwich.

Drop the blade holder on the front screw.

Then put the lock bar through the middle pin. Play with it a bit and make sure it drops cleanly into the notch on the blade holder. If anything is going to require tuning or sanding it'll be the interface between the lock bar and its notch there. It should also pivot freely on its pin. If it's a really tight draggy fit this will annoy you, and this'll make the lockup unreliable as well.
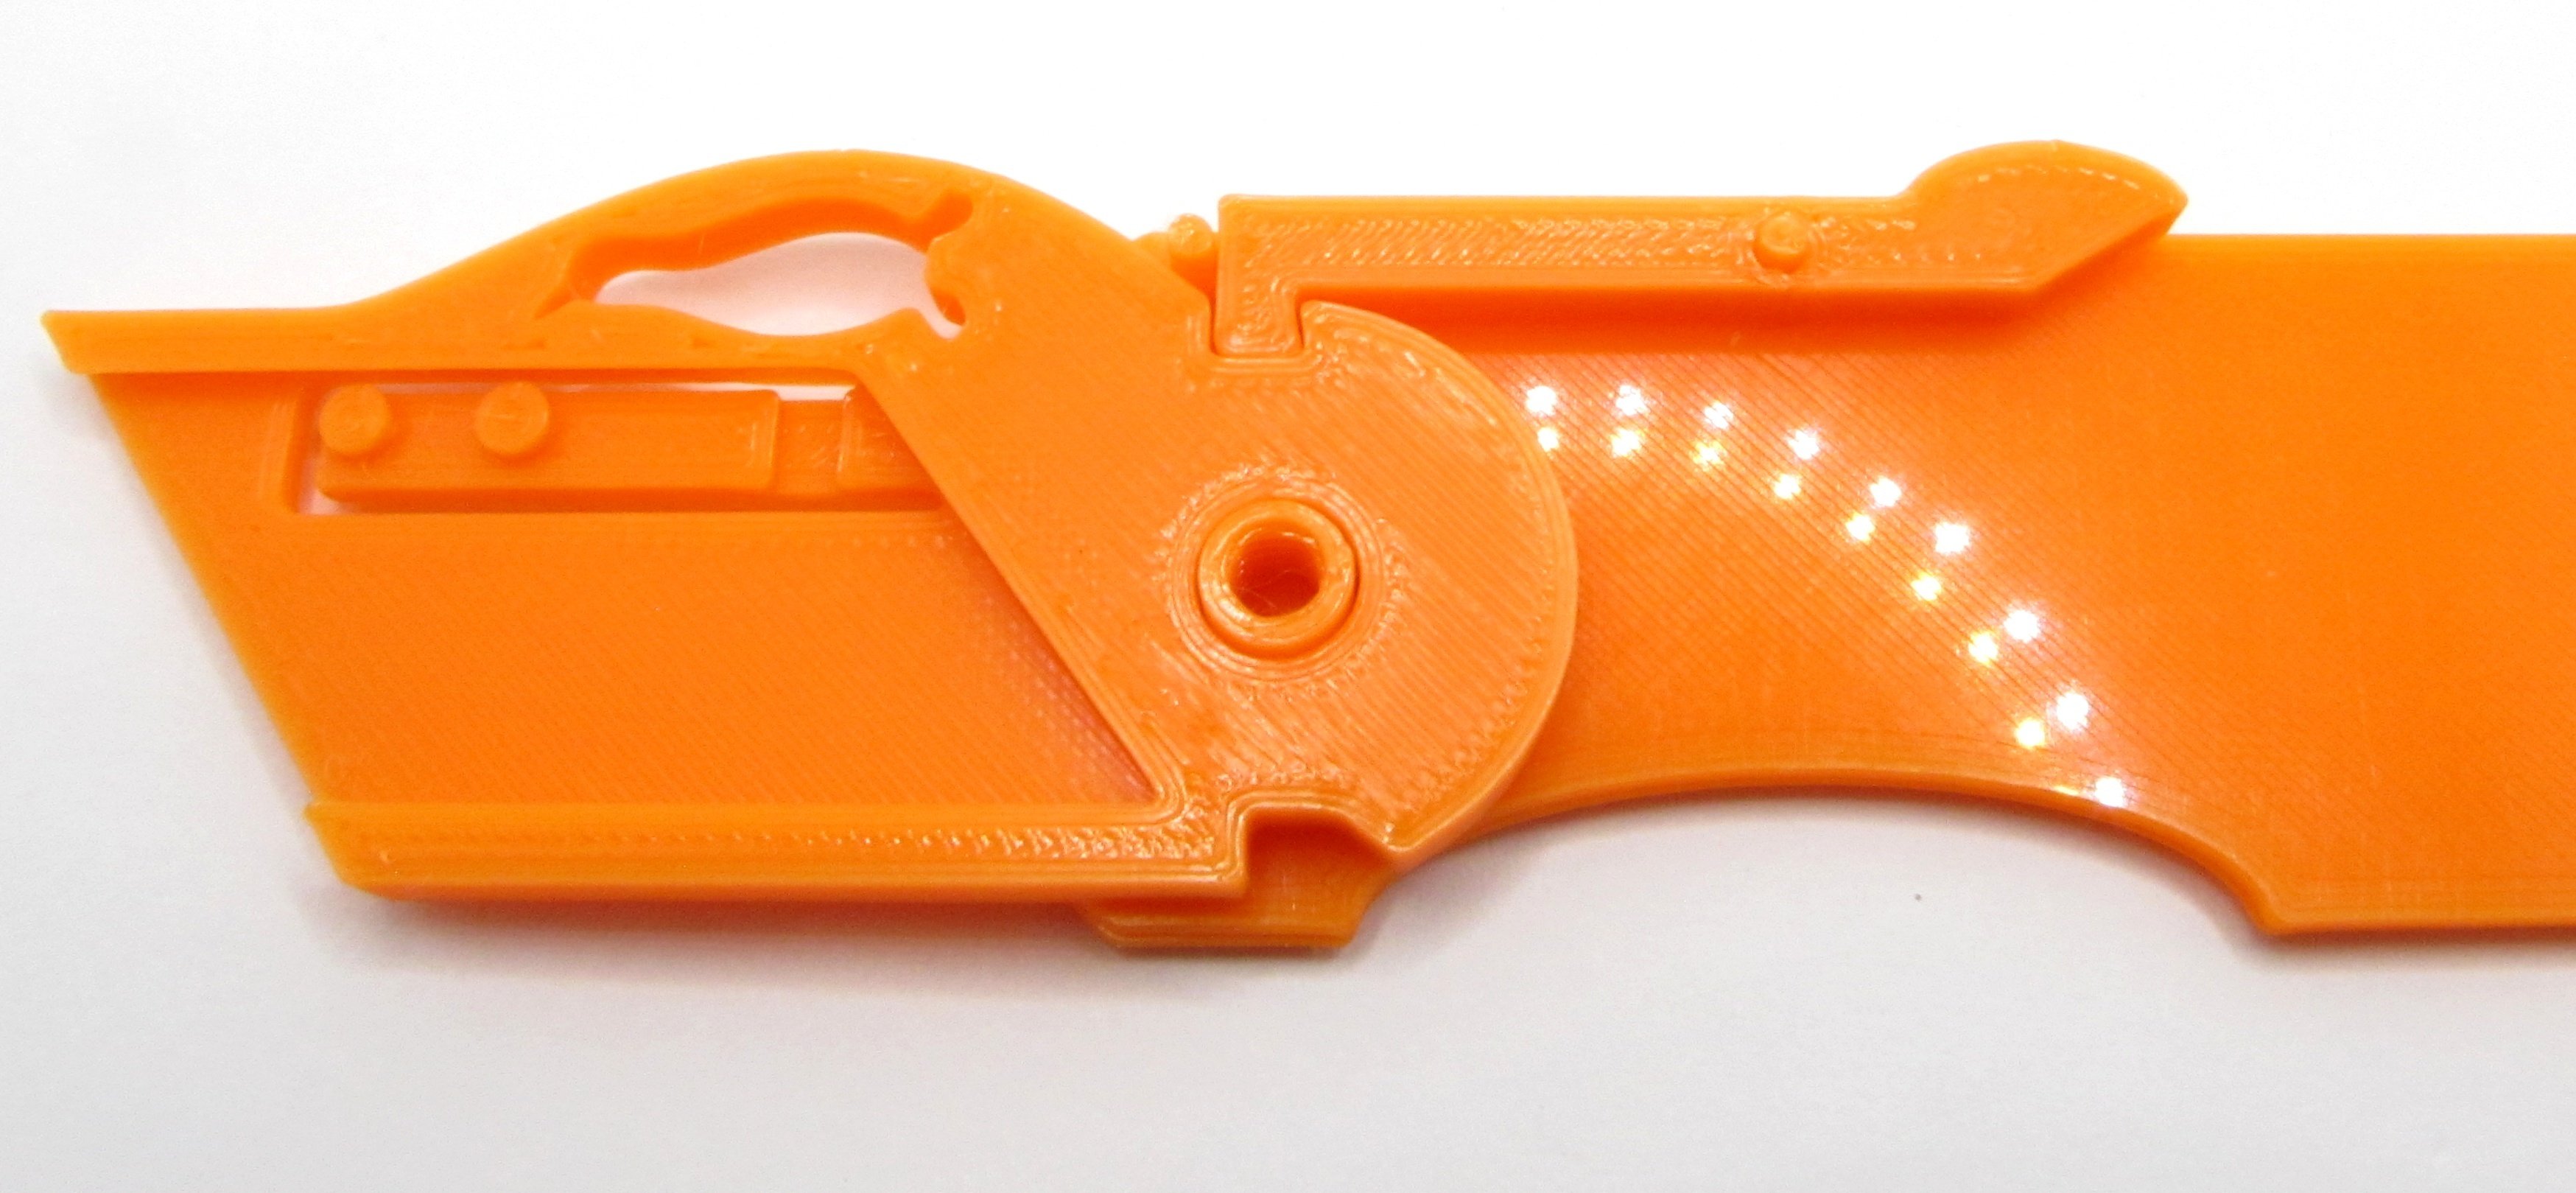
The spring block goes on next, and obviously the holes on it are for your last remaining pin plus the screw at the tail end of the knife. The prong on it goes below the end of the lock bar, i.e. on the inside. When you press the hump on the lock bar it should spring up and down satisfactorily.

Then the top liner goes on. All three pins should rest home in the holes in it.
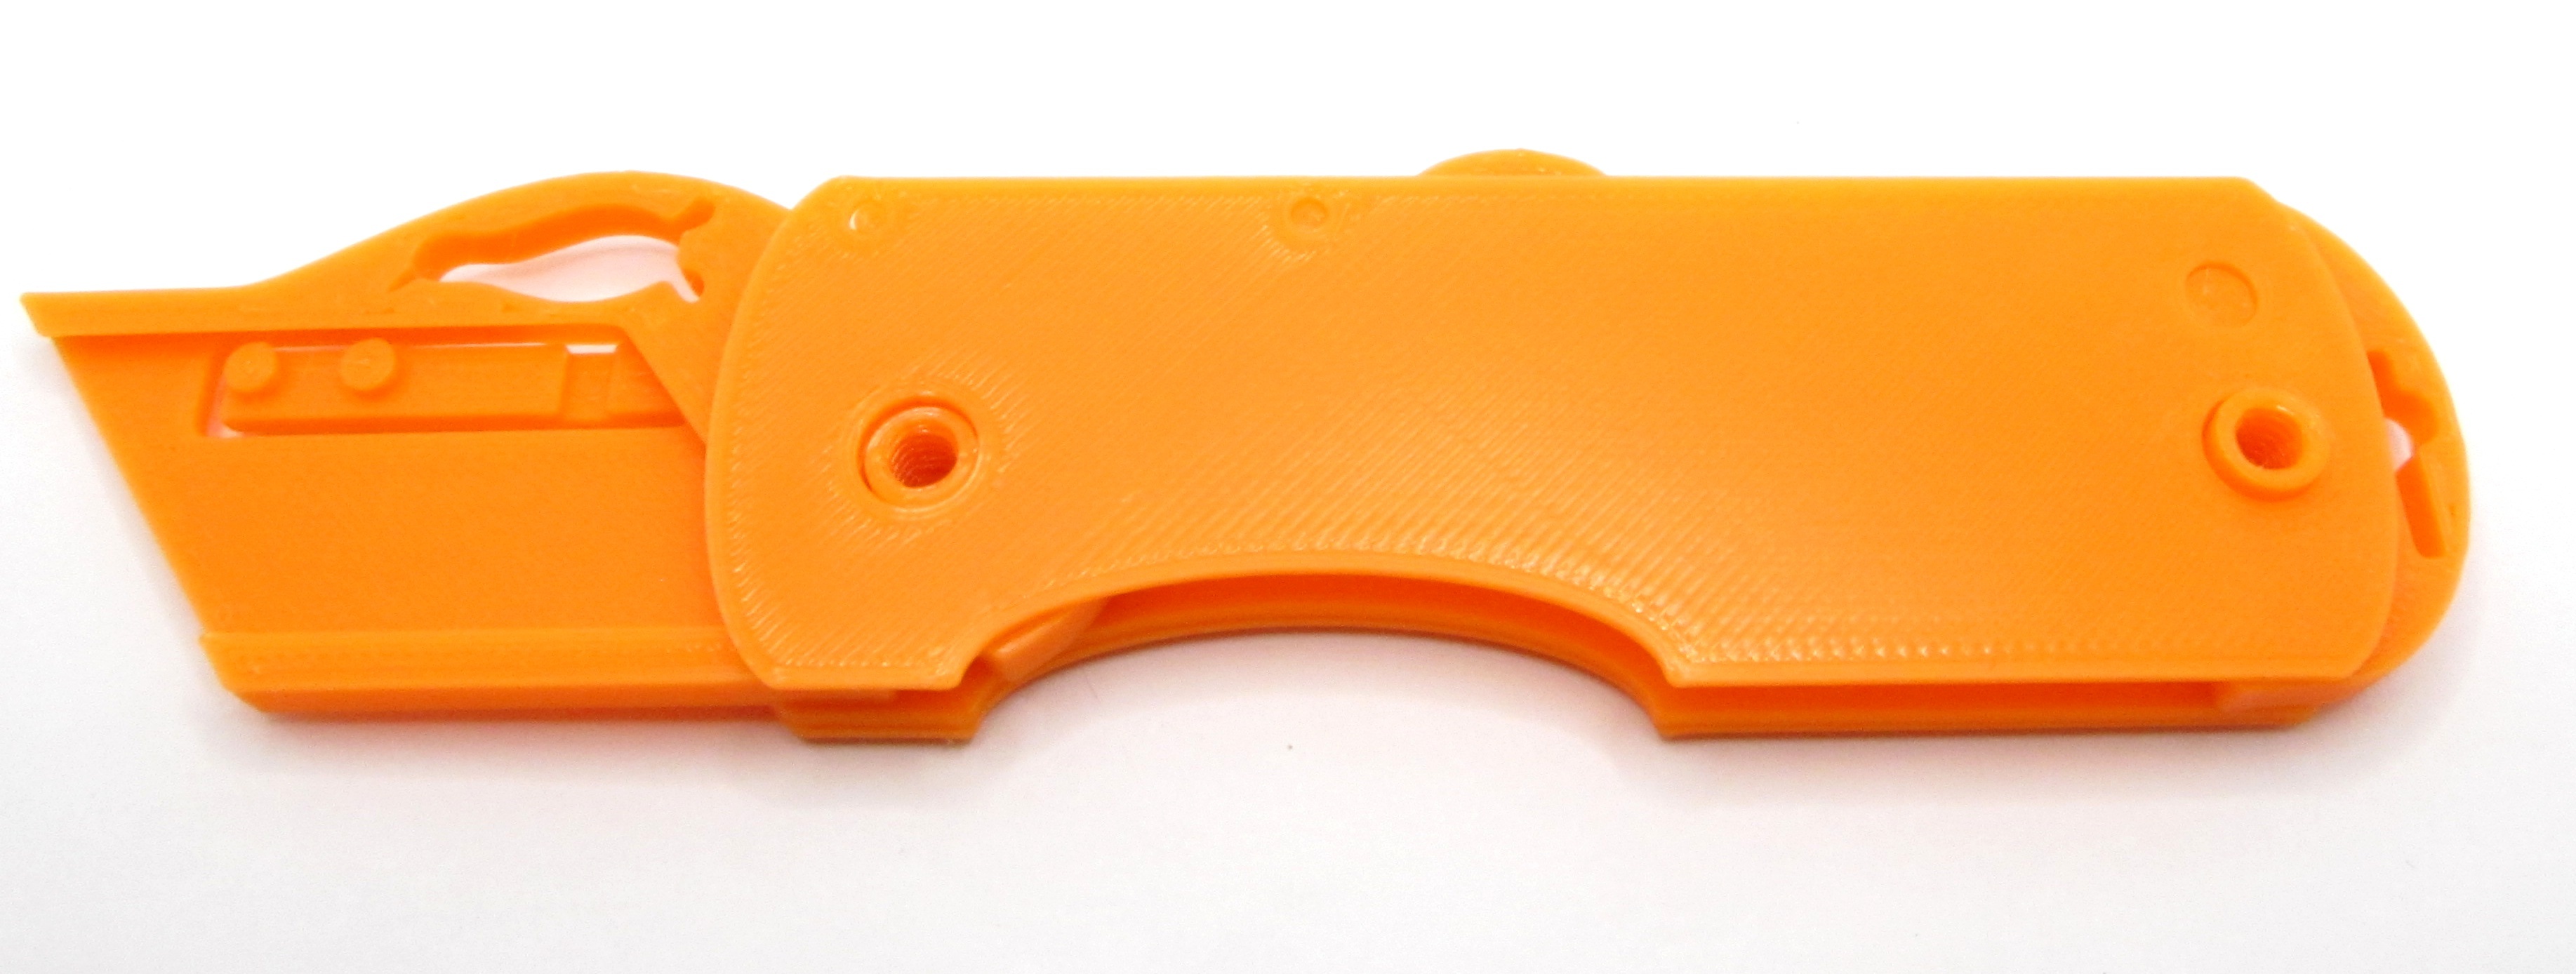
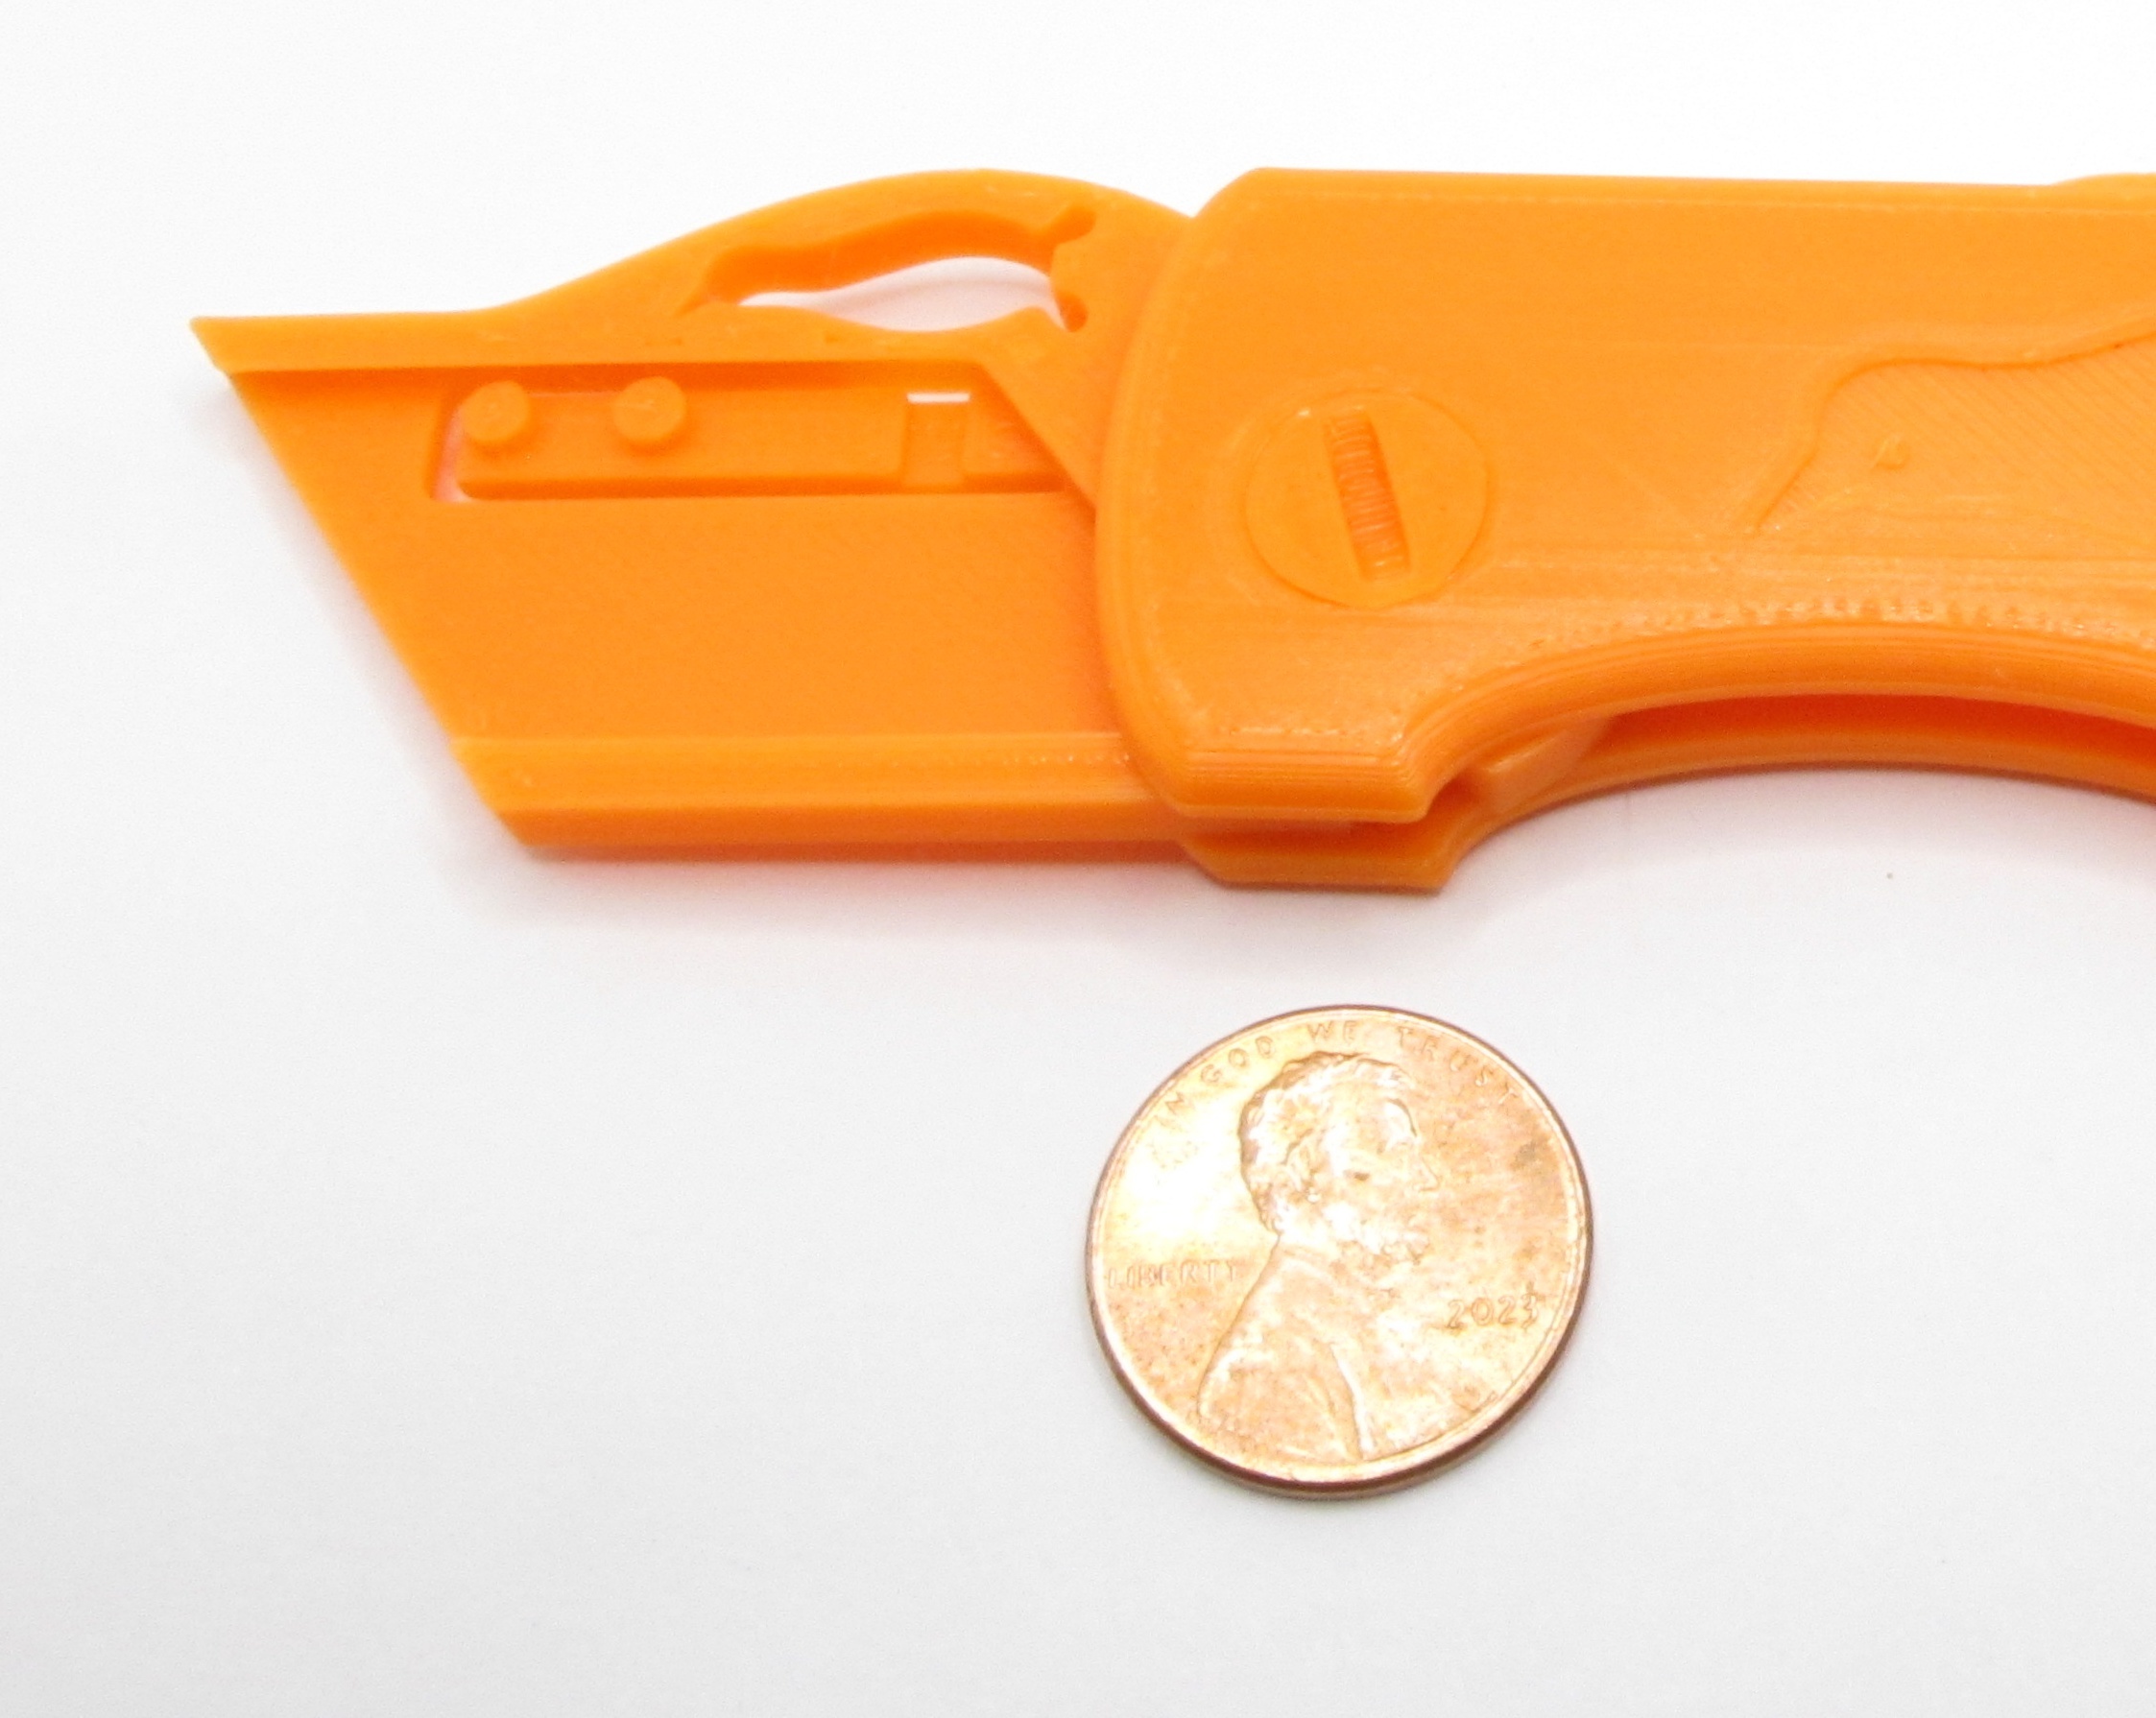
Then the top scale and its (male) screw. You can drive the screws with a penny if you're too perverse to use a screwdriver.
If you're going to use the pocket clip, decide which side you want it on (of course it's reversible; I'm not an animal) and stick it through the slot on the tail end of the knife.
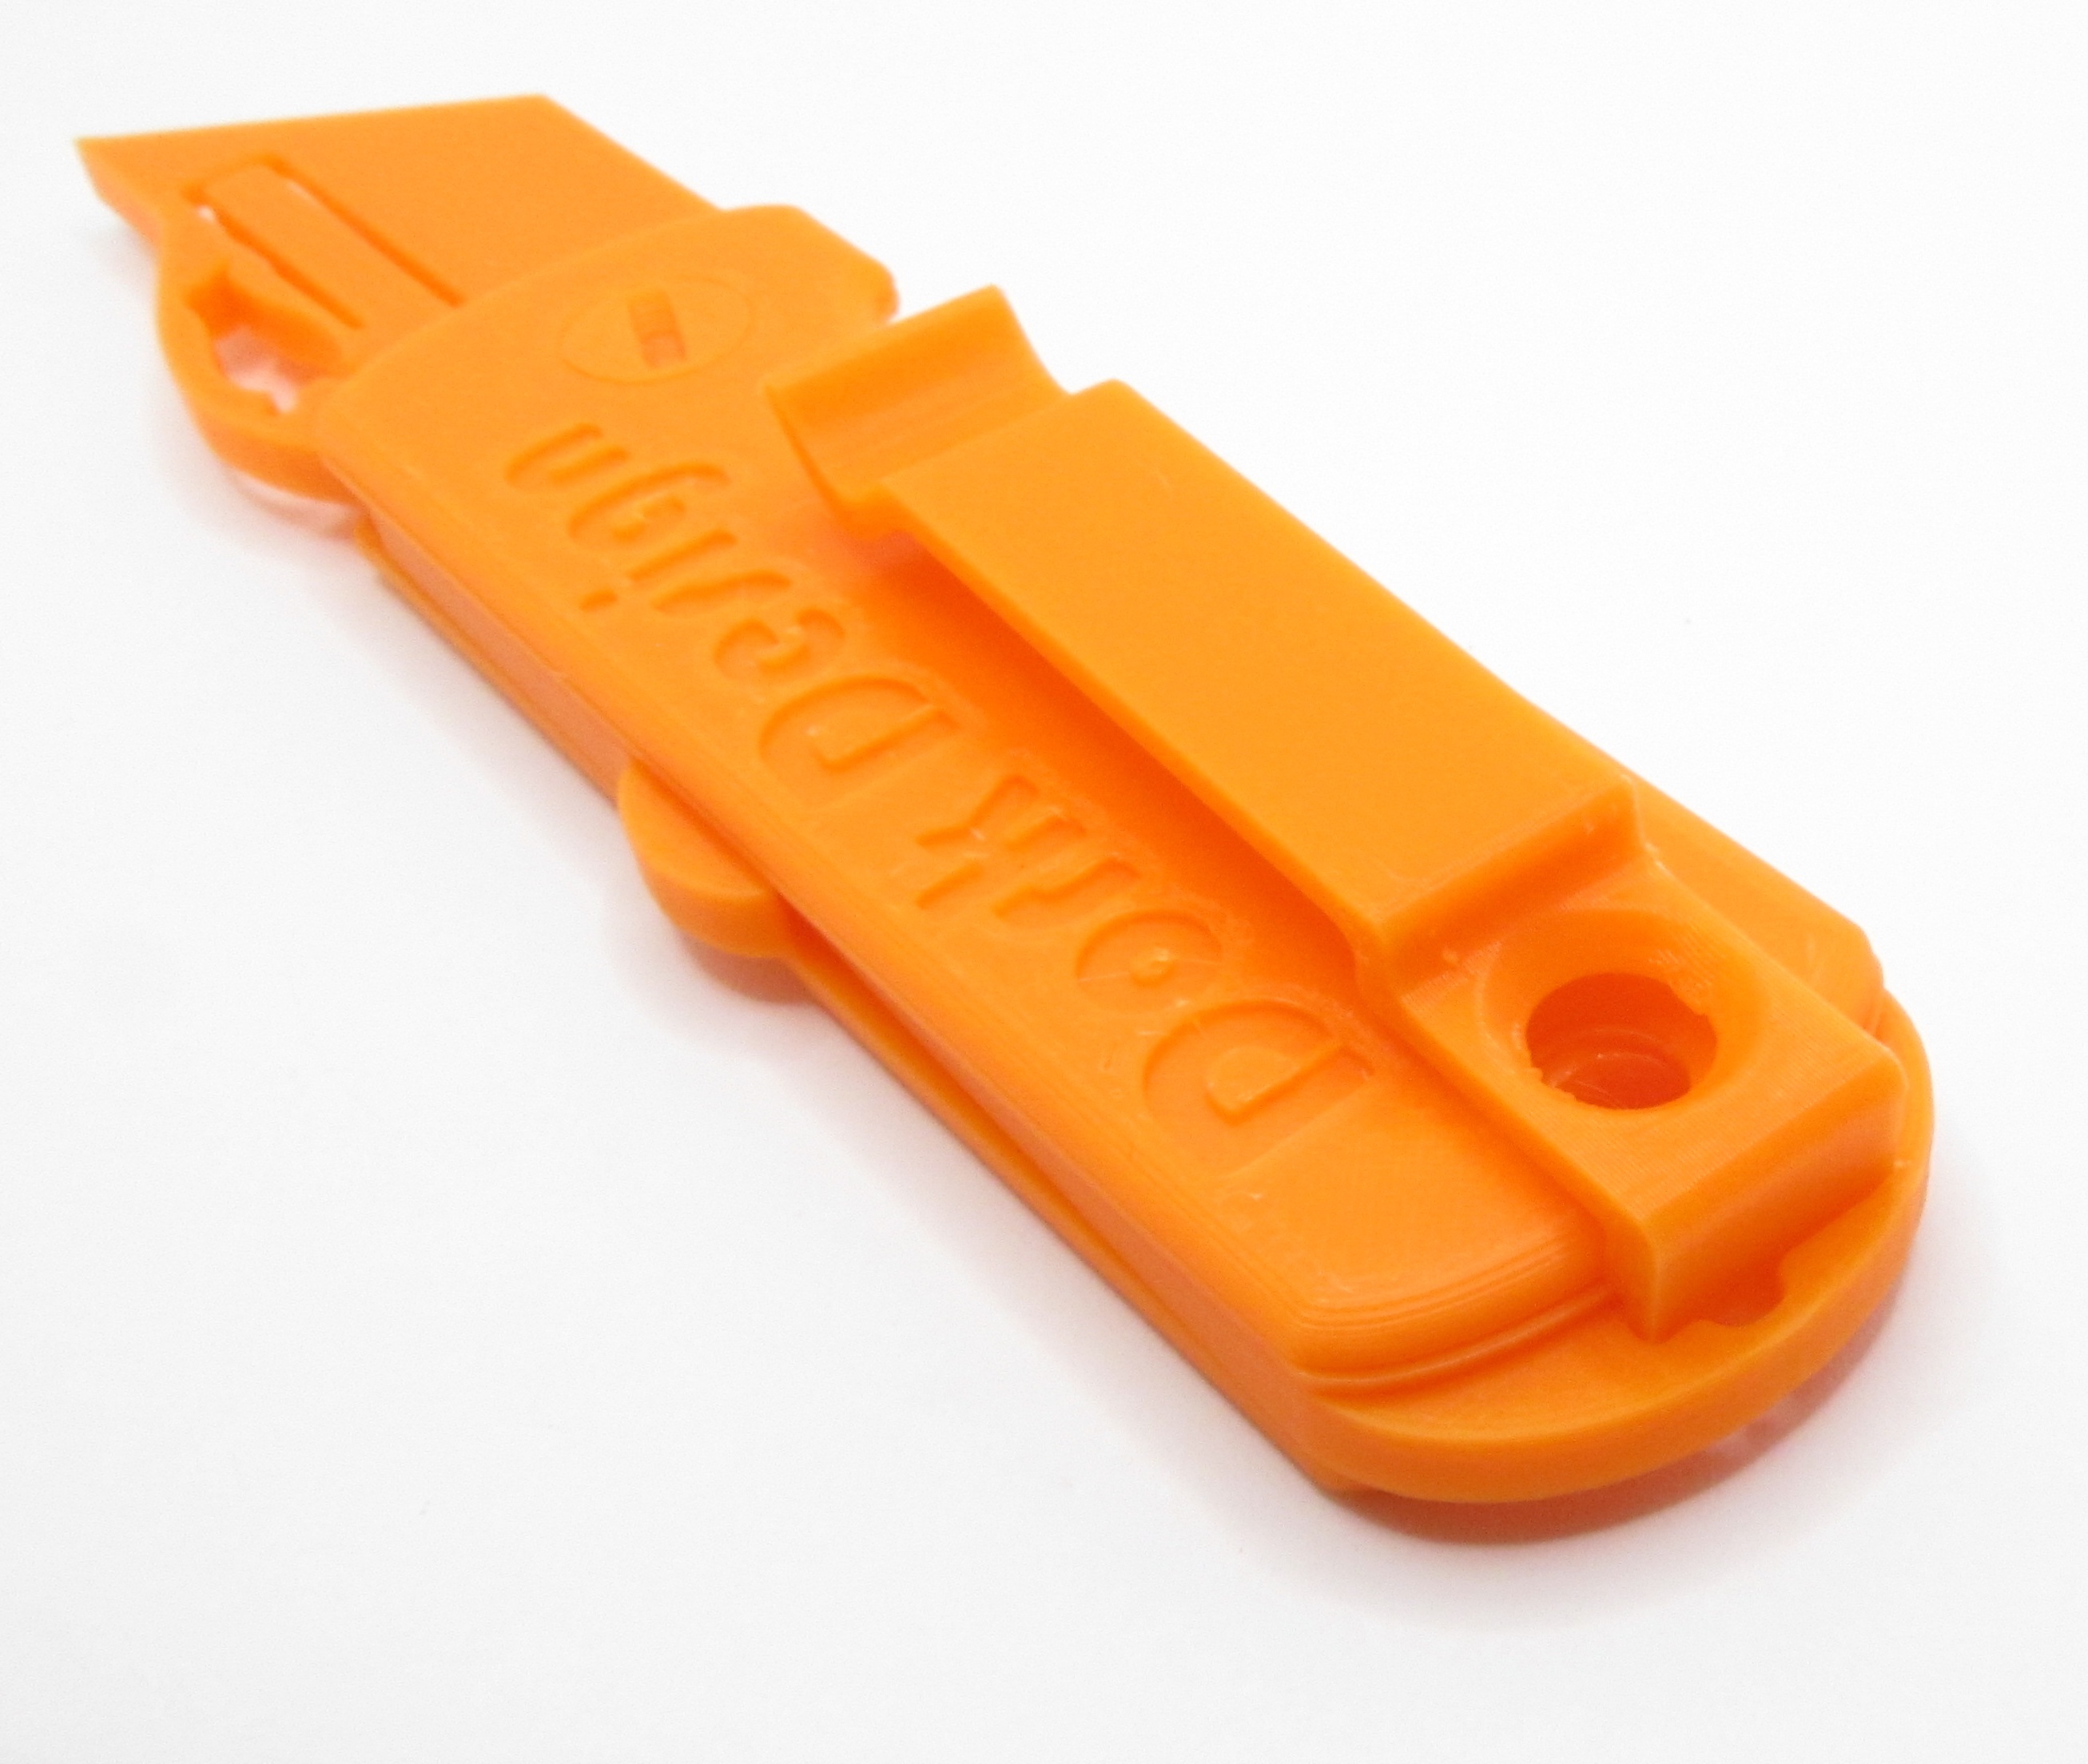
For strength, I recommend putting the female side of the tail screw through the clip, then through the rest of the assembly, and then put the male screw on the side that's not holding the clip. Depending on which side you chose to put the clip on you may have to take it out and stick it through from the other side.

FYI, if you don't use the pocket clip there is a hole in its mounting slot you can use to tie a lanyard through instead, if you're into that sort of thing.
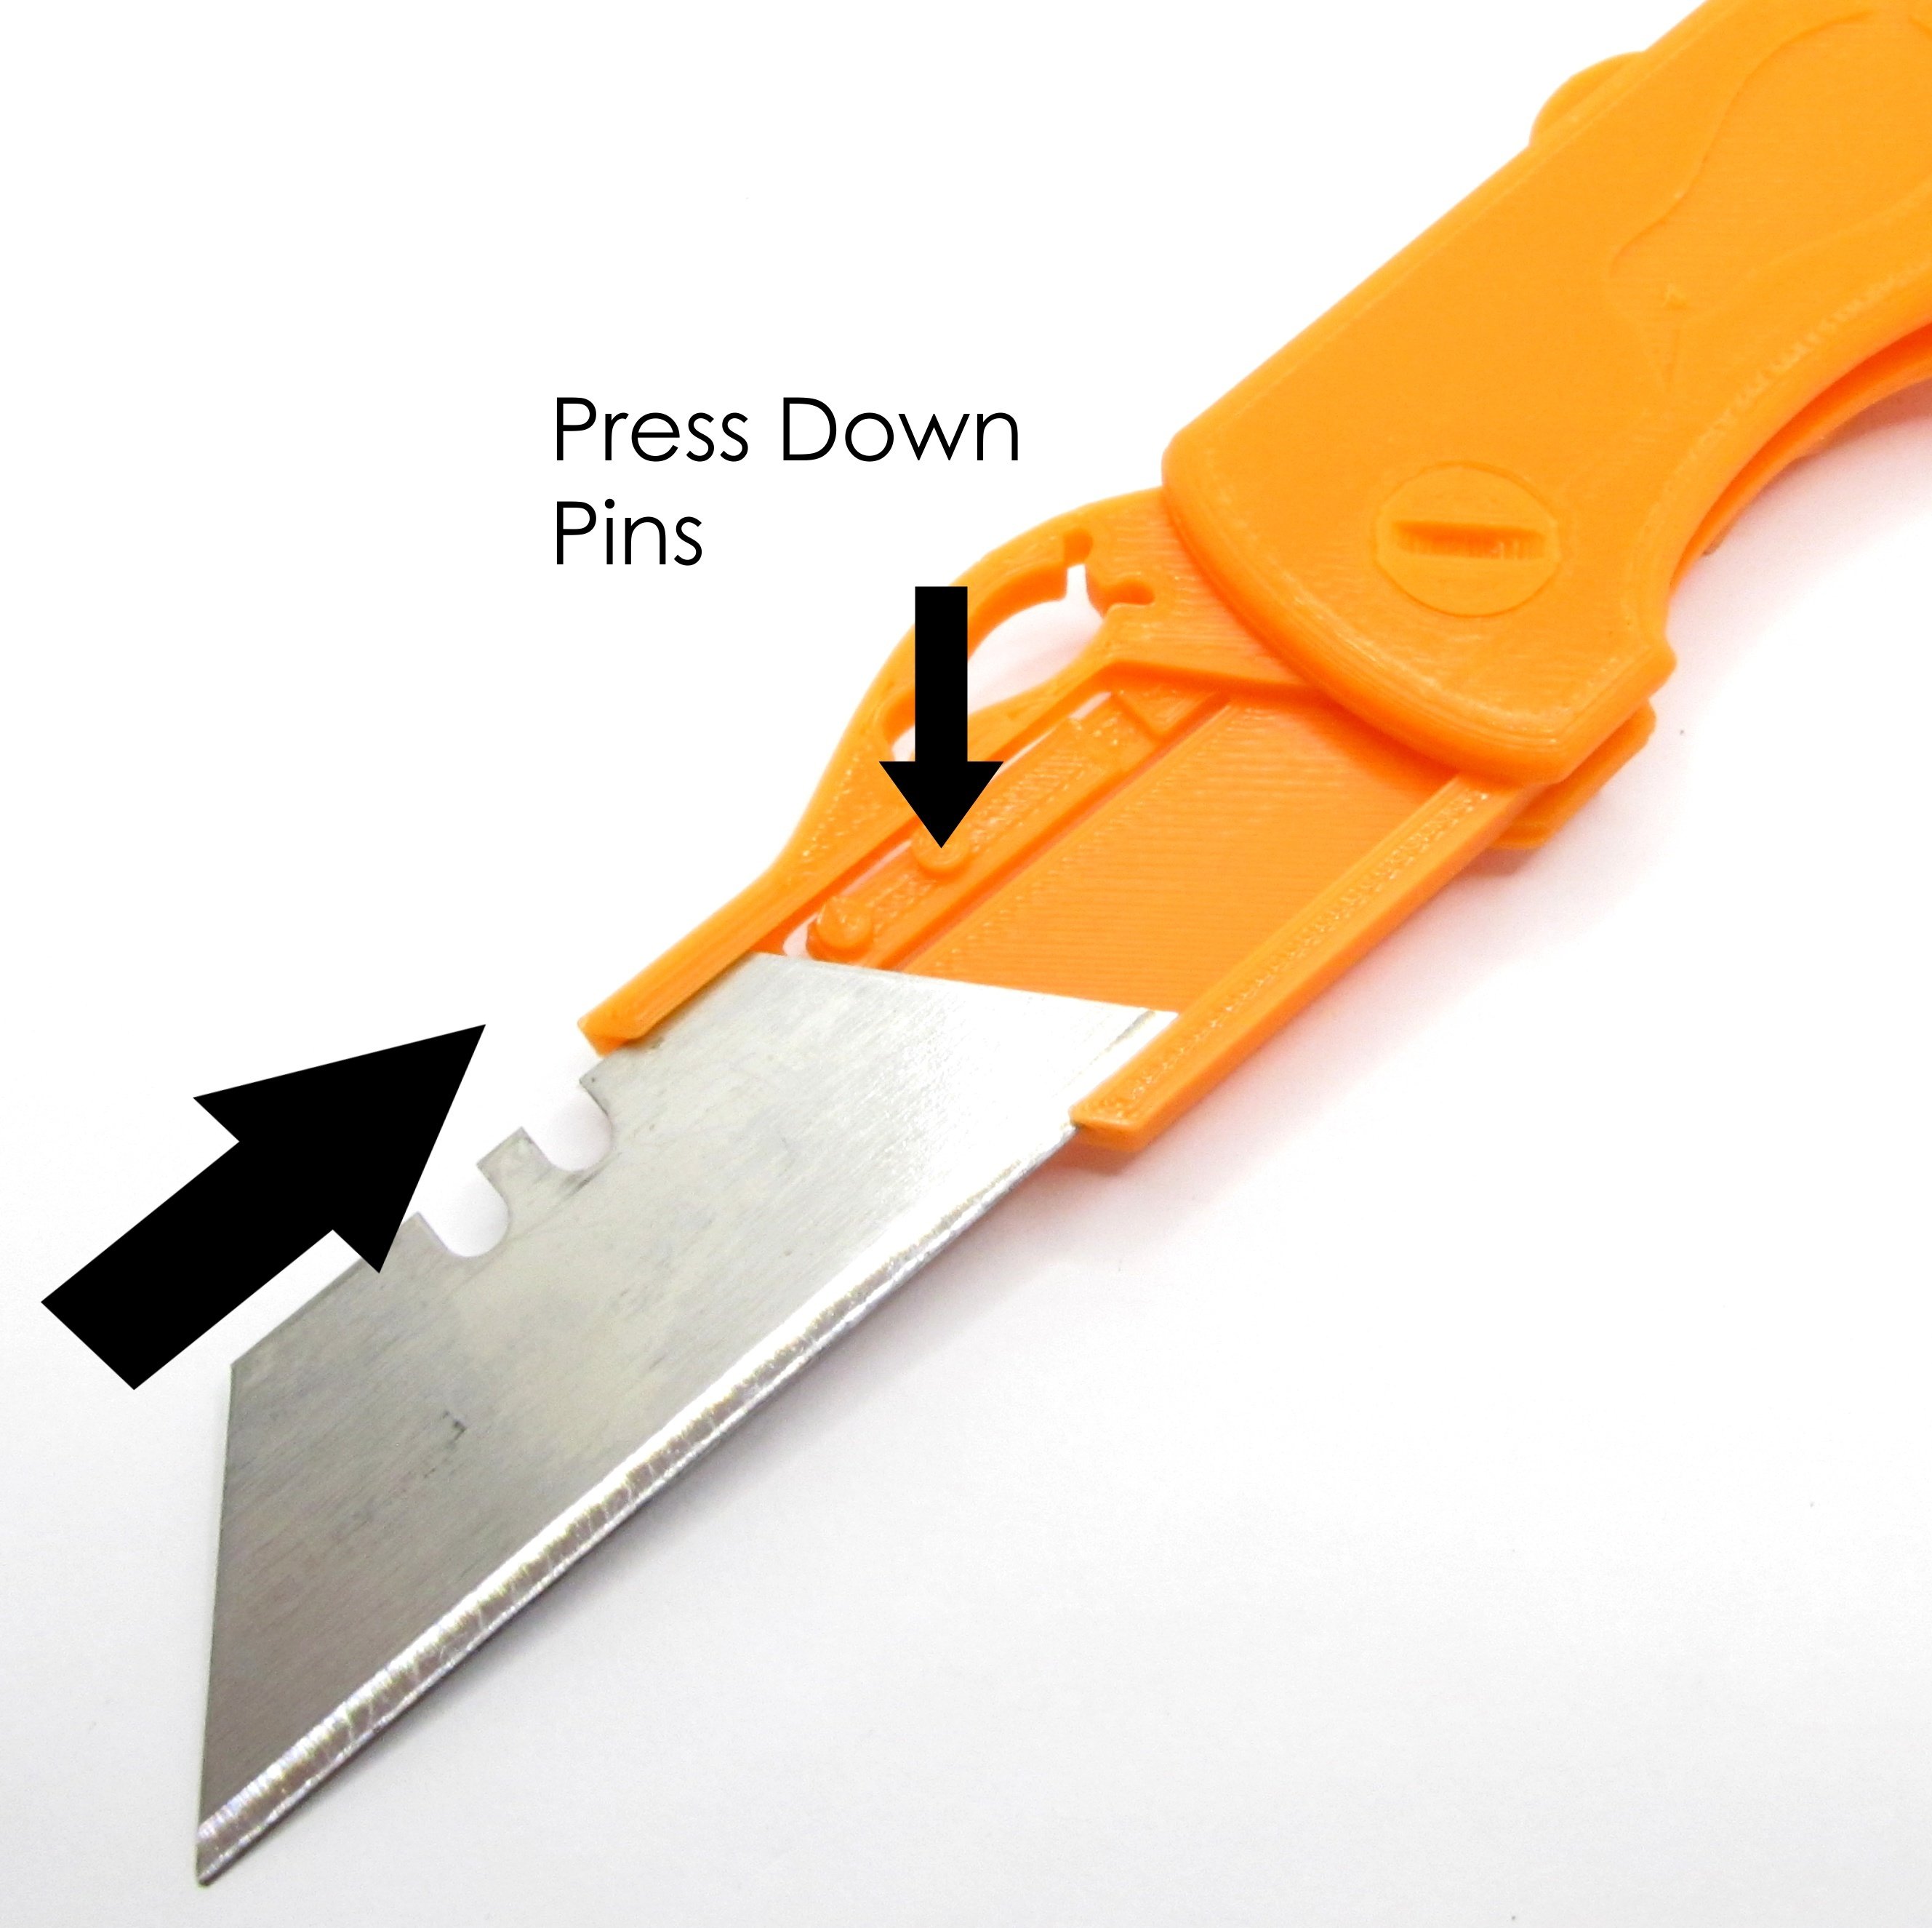
The blade slides in from the front and rides in a track that holds it on both the sharp edge and the blunt spine. Press the blade locking pin flexture down to get the pins to clear.
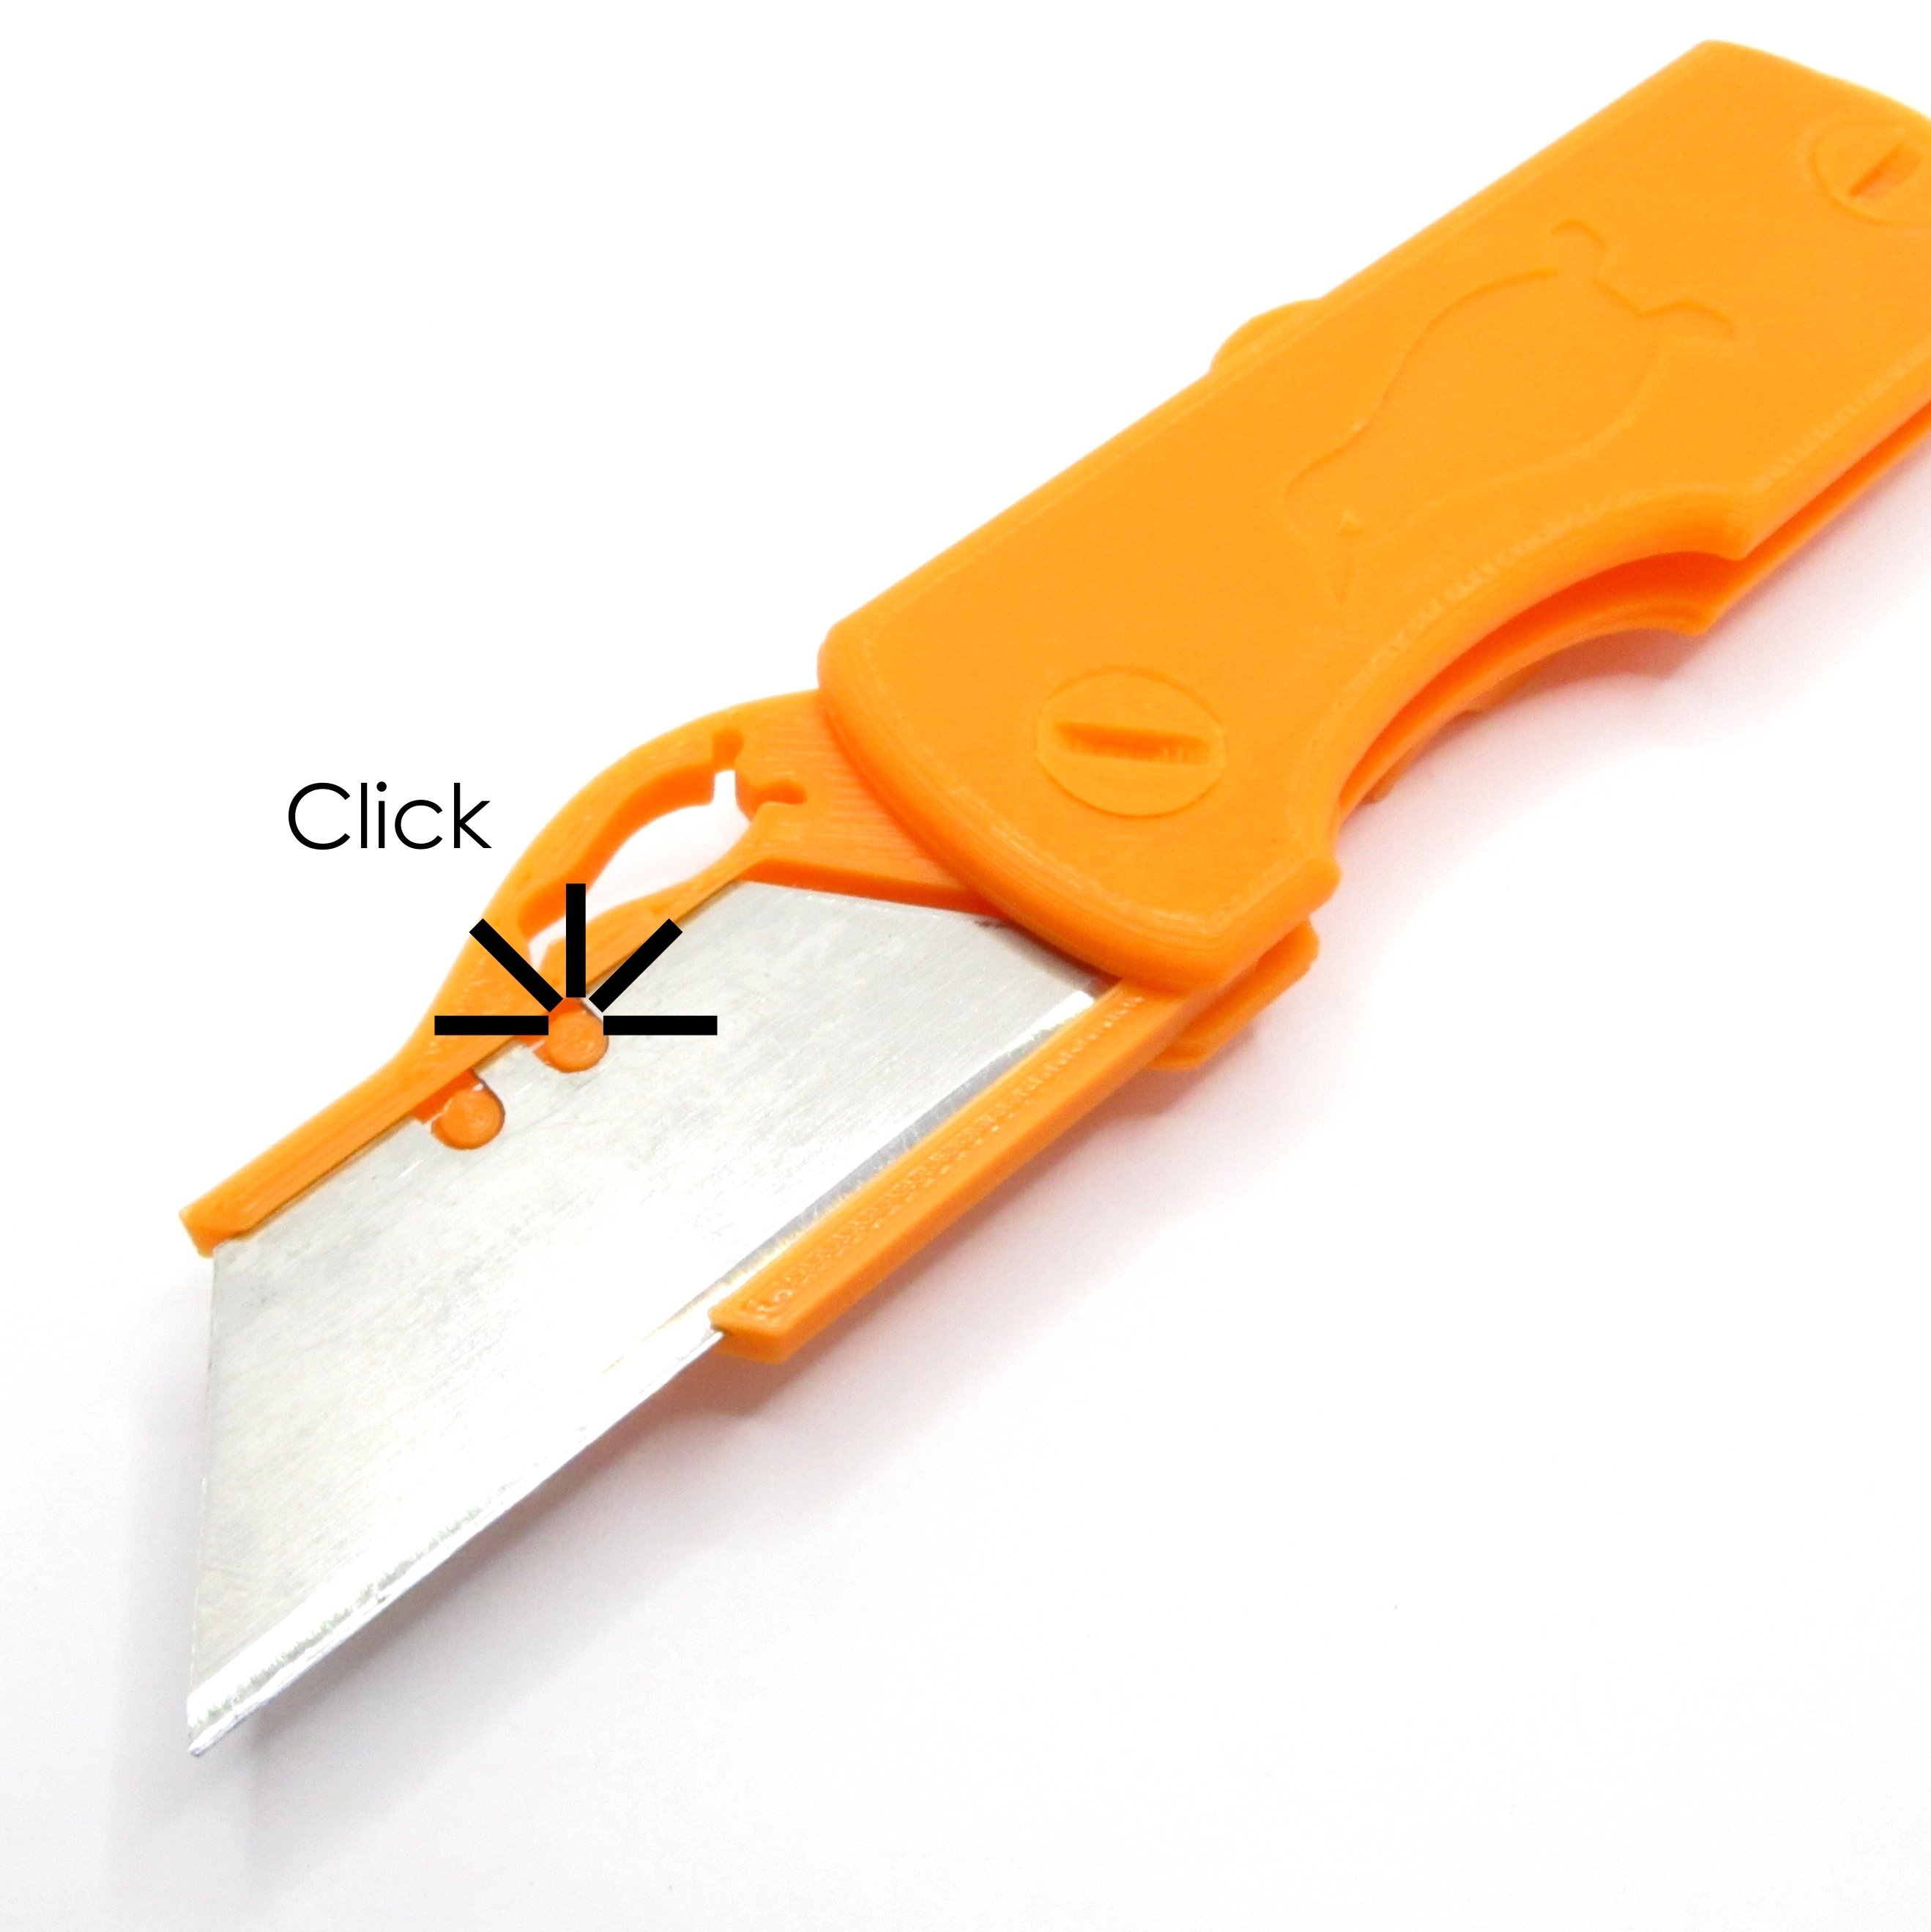
The pins ought to click into the two notches on your blade quite nicely. If you noticed that this is the same blade holding mechanism is very similar to the one on my last knife, that's because you're right and it's exactly the same.

Fin.

7
1
submitted 11 months ago by cetan@lemmy.world to c/knives@sopuli.xyz

cross-posted from: https://lemmy.world/post/9160400

cross-posted from: https://lemmy.world/post/9035683

And you'll never guess what kind of knife it is. Go on.

...

Yes, of course it's a balisong box cutter. Because it just is.

Update: And the .STL files are released! Get them here, along with assembly instructions, and other sundry bumf.

Okay, so it's not exactly an exciting custom collaboration with a big name manufacturer made out of a supersteel with rich exotic handle materials in a fancy matte box. That would require being considerably more involved with the industry than I am. Which is not at all.

Rather, this is a 3D printable utility/fiddle toy that's ~~ripped off from~~ just a smidge inspired by the Gerber EAB we were talking about the other day. Why doesn't anyone make a flipper like that?

So as our resident balisong expert, I just had to ask myself the other day just how hard developing a working balisong knife could be.

The answer is more than you'd think at first blush. I'm not at all ashamed to report that the production and assembly of one of these takes no less than 26 individual components if you include...

...The optional but fully functional pocket clip.

And yes, it even has a fancy kickerless design with "zen" pins like your big dollar brand name balisong model.

"But does it actually work?" I hear you cry.

You're damn skippy it does.

My design goals were: 1) Make a functional balisong knife that 2) is completely 3D printable without reliance on outside hardware -- other than the blade, obviously -- that 3) plays to the strengths and avoids as much as possible the weaknesses of filament deposition printing and 4) does not require using any supports.

(And yes, you could print the blade, too. If you wanted it to be laughably ineffective.)

Even the assembly hardware is 3D printed, and you can install it using nothing but a penny.

I know you all have been holding your breath until I posted this picture. There you go. You can breathe out now.

Oh, and also: Would you like to use this as a fidget toy that won't get you in too much trouble in polite company, or at the office, or in some backwater hellhole where balisong knives are illegal?

You're in luck. Because there's a blunt trainer blade for it, too.

The Burning Questions I Know You're Going To Ask:

Q: What are the sizes and weights?

42.1 grams. 1.48 ounces. This thing is the second lightest balisong knife I currently own. I designed it in metric, but in keeping with tradition around here it is almost exactly 5" long when closed, 7-1/2" long open (with a typical Stanley style blade installed), 1-1/8" of usable blade edge, and 5/8" of an inch thick (not including the pocket clip, which you can leave off).

Q: That's very funny, but the tolerances on this plastic piece of shit are terrible, right? What does the wiggle test look like, smart guy?

Bam. Stick that in your pipe and smoke it.

Q: But, it's made out of plastic. Isn't it going to break or erode into nothing, like, instantly?

I've been messing around with the above pictured example for about a week now and I've probably flipped it somewhere between six thousand and a zillion times by now. I've been using it to cut up boxes at work all week, too. It's as perfect as the day I minted it.

Q: Isn't cold creep in the PLA going to turn it into a banana eventually?

Maybe! Probably! We're sure as hell going to find out.

Q: Are you going to sell these or something?

I'm not ruling it out, but that wasn't my goal here. I might give a couple away at some point, though.

Q: Then can you shut up and give us the fucking STL files already?

Soon. In order to prevent this post from being longer than it already is, I'm going to release the files and assembly instructions separately. After I'm good and satisfied the design is well tuned enough to inflict upon the unwashed masses, anyway.

8
1
submitted 1 year ago by cetan@lemmy.world to c/knives@sopuli.xyz

cross-posted from: https://lemmy.world/post/6227971

New Knife Day! (Technically a few days behind but it was a busy weekend!)

My first SOG arrived over the weekend. The Terminus XR in S35VN. Used knife but basically brand new, and the price was good.

image

Action is great! The flipper deploy is "slow" feeling but very very smooth with a nice lock up. The shape of the crossbar lock thumb/finger ramps (?) (buttons? what do you call those?) are great. A world of difference compared to the Hogue Ritter that's for sure.

The grooves in the scales make for a lot of grip against the pocket so I expect this to shred the pants a bit.

image

(Ignore the weird color on the blade in the last photo, it was an odd reflection that I couldn't get rid of at the photographed angle.)

9
1
submitted 1 year ago* (last edited 1 year ago) by JaasBaas@lemmy.world to c/knives@sopuli.xyz

I just purchased a civivi riffle and I am planning to pretty much black it out. It came with the dark green scales which I plan to dye black, but where would I be able to get the proper hardware so the screws are black as well.

10
1
11
1
submitted 1 year ago* (last edited 1 year ago) by Zak@lemmy.world to c/knives@sopuli.xyz

I want a folding knife that can get away with most most of the things I know better than to do with a folding knife. That leads to specific criteria:

  • Price: under $100, lower is better. I might break it.
  • Lock: crossbar, backlock, compression, or something similarly strong. Not liner/frame/button. I might want to trust the lock more than is prudent.
  • Steel: tough stainless like AEB-L, 14C28N, or Nitro-V. I might baton through salt-driftwood with it and put it away wet. See toughness chart.
  • Blade: Ideally 3.25-2.5" (85-90mm) and a tip that isn't dainty. I might pry with it.
  • Pivot: washers, not bearings. I might get mud in it.
  • I dislike thumbstuds, but will accept them if they're not in the cutting path.
12
1
13
1
Darken a D2 Knife (lemmy.world)
submitted 1 year ago by JaasBaas@lemmy.world to c/knives@sopuli.xyz

I am very new to the knife collecting world. I currently have a D2 knife that I carry daily but I wanted to know what would be the best way to darken the color of the blade and potentially provide more corrosion resistance as well. I'm considering acid-etching but have also heard you could soak a knife in vinegar as well.

What would be the best option here? Any help is appreciated.

14
1
submitted 1 year ago by ki77erb@lemmy.world to c/knives@sopuli.xyz

Sure it mostly gets used for opening boxes but it also comes in handy a lot!

15
1
16
1

Was going to post some more new content today but I'm getting a JSON error message every time I try to upload an image. Any idea what's up?

17
1
submitted 1 year ago by mrcranky@lemmy.ca to c/knives@sopuli.xyz

These are cheap, sharp, easy to maintain, and you don't feel too bad if they get lost. I lent my son my suitcase, with my previous no.8 in the inside pocket by accident and he made it through three airports before the TSA in Chicago confiscated it. Apart from the memories it held, it was no huge loss and i had it replaced the next day.

18
1

Nice looking work IMO. And for a very good cause, at least if you're in the US.

19
1

Spyderco did this one in gray G-10 and BD1N with a lasermarked blade for the Knife Rights auction. The Alcyone is obv one of their cheaper models but I really like the walk and talk.

20
1

Sharp as all hell, too.

21
2

These guys are out of Ukraine and are a little more famous for doing SAK type knives with spiderholes. This is a one off slippy in jigged and acid washed M398 and hand carved, weathered brass.

22
1

The needle bearings give it a very distinctive, hissing action that I just love.

23
1

This is seriously one of the best knives released in the last few years at any price, and the US price is under $70. They're hard to find but it's a 4 inch VG10 blade, a titanium frame, and needle bearings.

24
1

It's glittery in the light and has a lot of what you'd call chatoyance if it were a wooden handle -- a bit 3D in the reflection of light. Beautiful.

25
1

TwoSun released two models in what they are calling 'crystalline anodization'. Not sure how they do it, but it sure does look nice in person.

view more: next ›

knives

0 readers
1 users here now

Just trying to get things started

founded 1 year ago
MODERATORS